
Shibboleth SPv3 Installation on Ubuntu 22.04 LTS
In this lab we are going to enable shibboleth login for Moodle and Wordpress web applications. Installation assumes you have already installed Ubuntu Server 22.04 with default configuration and has a public IP connectivity.
Here we will install applications under below sub domains.
Moodle => lms.YOUR-DOMAIN Wordpress => wp.YOUR-DOMAIN
Install Apache Web Server
First we will install apache web server. Once logged into the system you need to update the Ubuntu package repository.
sudo apt update
Then install the web server.
sudo apt install apache2
Check the apache version
apache2 -v
Now visit your server through the IP address. http://server_ip_address.

PHP Installation
Then install PHP and related modules required for apache server and MariaDB.
sudo apt install php libapache2-mod-php php-mysql
To test that your system is properly configured for PHP, create a PHP script called info.php. Here we will create at the root directory.
sudo nano /var/www/html/info.php
Insert the following command to show the php information.
<?php
phpinfo();
?>

Next go to http://your_IP/info.php URL and you will get page showing the php information,
MariaDB DBMS Installation
Here we will choose MariaDB DBMS as our database application. Install this using below command.
sudo apt install mariadb-server mariadb-client
Once installed check the version,
mysql --version
For mysql there is a script that strengthen the mariaDB server security. It is a series of yes no questions which removes initial weaknesses of the server.
To execute the scripts,
sudo mysql_secure_installation
NOTE: RUNNING ALL PARTS OF THIS SCRIPT IS RECOMMENDED FOR ALL MariaDB
      SERVERS IN PRODUCTION USE!  PLEASE READ EACH STEP CAREFULLY!

In order to log into MariaDB to secure it, we'll need the current
password for the root user. If you've just installed MariaDB, and
haven't set the root password yet, you should just press enter here.

Enter current password for root (enter for none):
OK, successfully used password, moving on...

Setting the root password or using the unix_socket ensures that nobody
can log into the MariaDB root user without the proper authorisation.

You already have your root account protected, so you can safely answer 'n'.

Switch to unix_socket authentication [Y/n] n
 ... skipping.

You already have your root account protected, so you can safely answer 'n'.

Change the root password? [Y/n] y
New password:
Re-enter new password:
Password updated successfully!
Reloading privilege tables..
 ... Success!


By default, a MariaDB installation has an anonymous user, allowing anyone
to log into MariaDB without having to have a user account created for
them.  This is intended only for testing, and to make the installation
go a bit smoother.  You should remove them before moving into a
production environment.

Remove anonymous users? [Y/n] y
 ... Success!

Normally, root should only be allowed to connect from 'localhost'.  This
ensures that someone cannot guess at the root password from the network.

Disallow root login remotely? [Y/n] y
 ... Success!

By default, MariaDB comes with a database named 'test' that anyone can
access.  This is also intended only for testing, and should be removed
before moving into a production environment.

Remove test database and access to it? [Y/n] y
 - Dropping test database...
 ... Success!
 - Removing privileges on test database...
 ... Success!

Reloading the privilege tables will ensure that all changes made so far
will take effect immediately.

Reload privilege tables now? [Y/n] y
 ... Success!

Cleaning up...

All done!  If you've completed all of the above steps, your MariaDB
installation should now be secure.

Thanks for using MariaDB!
To login MariaDB enter below command and use the password entered above.
mysql -u root -p

To exit type,
exit
Registering your Domain Names and DNS configuration for your Domains
As you know we can't use any preferred domain for our services, websites as we wanted to do. First we have to register them in a relevant domain registry where usually we have to pay. In case you want a ac.lk sub domain you have to get it through LEARN. Once you get your domains registered they are to be assigned IP addresses so that they can be used in your services for hosting services, websites etc. Assigning of IP addresses to the domain names is done through DNS lookup service. This DNS service is also can be accomplished through the relevant domain registry or web hosting service. For the ac.lk domain, LEARN or your institutional network/system administrator will do that for you.
Receiving domains costs or need the approval from the System Administrator. Hence, for this workshop we can use hosts file in your computer operating system to create any arbitrary domain for your self. Hosts file will override any public DNS but only for your own computer.
Add domains to the hosts file in Windows
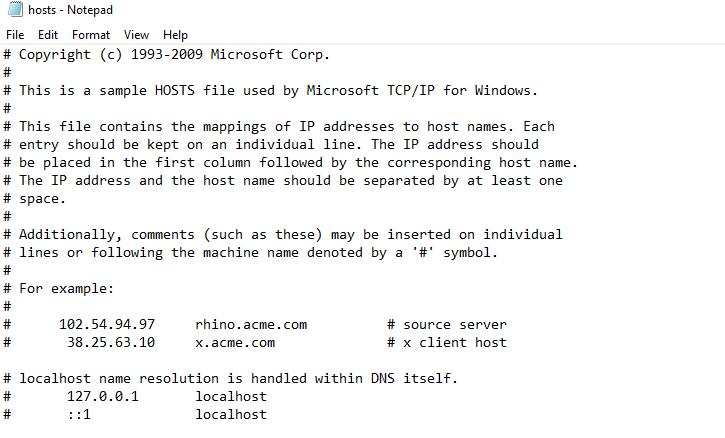
To add domains to the hosts file in Windows please Run the Notepad as the Adminitrator as below.

Then go to /Windows/System32/drivers/etc directory. If you cannot view hosts file please select All Files from the drop down list at bottom. Now open hosts file.

Now edit the hosts file.

Add the below entries to the end of the file. IP is your SP virtual machine public IP given for the lab.
192.248.6.X wp.YOUR-DOMAIN
192.248.6.X lms.YOUR-DOMAIN
Add domains to the hosts file in Linux (If your host machine OS is Linux)
To add domains to the hosts file edit the hosts file as below. Please make sure to replace YOUR-DOMAIN with your own domain like 'instxx.ac.lk'. Once done save it.
nano /etc/hosts


127.0.0.1 localhost
192.248.6.X wp.YOUR-DOMAIN
192.248.6.X lms.YOUR-DOMAIN
Now you should be able to access the virtual hosts by their domain names from your host computer.
To check it you can ping to the domain or browse from the web browser.
ping wp.YOUR-DOMAIN
ping lms.YOUR-DOMAIN
Apache Virtual Host Configuration
First we are going to install Moodle LMS and Wordpress CMS applications and enable Shibboleth login for those. now let's make a directories for hosting those web sites.
For Moodle,
sudo mkdir -p /var/www/lms.YOUR-DOMAIN/public_html
For Wordpress,
sudo mkdir -p /var/www/wp.YOUR-DOMAIN/public_html
Then add relevant apache configuration file for Moodle as below.
sudo nano /etc/apache2/sites-available/lms.YOUR-DOMAIN.conf
And add the content below.
<VirtualHost *:80>
    ServerName lms.YOUR-DOMAIN
    ServerAlias lms.YOUR-DOMAIN
    ServerAdmin webmaster@lms.YOUR-DOMAIN
    DocumentRoot /var/www/lms.YOUR-DOMAIN/public_html

    ErrorLog ${APACHE_LOG_DIR}/lms.YOUR-DOMAIN-error.log
    CustomLog ${APACHE_LOG_DIR}/lms.YOUR-DOMAIN-access.log combined
</VirtualHost>
Next add relevant apache configuration file for Wordpress as well.
sudo nano /etc/apache2/sites-available/wp.YOUR-DOMAIN.conf
<VirtualHost *:80>
    ServerName wp.YOUR-DOMAIN
    ServerAlias wp.YOUR-DOMAIN
    ServerAdmin webmaster@wp.YOUR-DOMAIN
    DocumentRoot /var/www/wp.YOUR-DOMAIN/public_html

    ErrorLog ${APACHE_LOG_DIR}/wp.YOUR-DOMAIN-error.log
    CustomLog ${APACHE_LOG_DIR}/wp.YOUR-DOMAIN-access.log combined
</VirtualHost>
Once we do the configurations we have to enable the created sites as below,
sudo a2ensite lms.YOUR-DOMAIN
sudo a2ensite wp.YOUR-DOMAIN
Once done, test the configuration for any syntax errors with.
sudo apachectl configtest
Restart the Apache service for the changes to take effect.
sudo systemctl restart apache2
Now we should be able to enter above URLs on the browser to check whether they are working. You may get empty web pages since we haven't yet installed our web sites.
Installing Web Applications
First let us download the required softwares.
mkdir -p /opt/softwares/
cd /opt/softwares/
apt install unzip
wget https://download.moodle.org/download.php/direct/stable401/moodle-latest-401.tgz
tar -xvzf moodle-latest-401.tgz

wget https://wordpress.org/latest.zip
unzip latest.zip
To install Moodle web application please refer to this link
To install Wordpress web application please refer to this link
Securing Web Sites
Here we have to create SSL certificates and assign them to the virtual hosts created. We can create SSL certificates using three methods.
- Generate a self-signed certificates
- Create certificates using Let's Encrypt free SSL service.
- Receiving certificates from a Commercial Certificate Authority.
Here we will the method 1 and generate self-signed certificates for the domains.
To generate self signed certificates for the Moodle LMS enter below command.
openssl req -x509 -newkey rsa:4096 -keyout /etc/ssl/private/ssl-lms.key -out /etc/ssl/certs/ssl-lms.crt -nodes -days 1095
Here you will be prompted for some domain related informations and enter them as appropriately.
You are about to be asked to enter information that will be incorporated
into your certificate request.
What you are about to enter is what is called a Distinguished Name or a DN.
There are quite a few fields but you can leave some blank
For some fields there will be a default value,
If you enter '.', the field will be left blank.
-----
Country Name (2 letter code) [AU]:LK
State or Province Name (full name) [Some-State]:Central Province
Locality Name (eg, city) []:Peradeniya
Organization Name (eg, company) [Internet Widgits Pty Ltd]:LEARN
Organizational Unit Name (eg, section) []:IT Division
Common Name (e.g. server FQDN or YOUR name) []:lms.dhammikalalantha.com
Email Address []:lalantha@learn.ac.lk
After generating certificates you have to enable ssl module and restart apache.
sudo a2enmod ssl

sudo systemctl restart apache2
Since we have now SSL certificates we will use them to enable SSL on our created web sites/domains.
Go to the directory below and create the SSL configuration file,
cd /etc/apache2/sites-available
nano lms.YOUR-DOMAIN-ssl.conf
<IfModule mod_ssl.c>
        <VirtualHost *:443>

                ServerName lms.YOUR-DOMAIN
                ServerAdmin you@YOUR-DOMAIN
                DocumentRoot /var/www/lms.YOUR-DOMAIN/public_html

                ErrorLog ${APACHE_LOG_DIR}/lms-error.log
                CustomLog ${APACHE_LOG_DIR}/lms-access.log combined

                SSLCertificateFile /etc/ssl/certs/ssl-lms.crt
                SSLCertificateKeyFile /etc/ssl/private/ssl-lms.key

        </VirtualHost>
</IfModule>
Then to enable the site
a2ensite lms.YOUR-DOMAIN-ssl.conf
Also create SSL site configuration file for Wordpress site too.
nano wp.YOUR-DOMAIN-ssl.conf
<IfModule mod_ssl.c>
        <VirtualHost *:443>

                ServerName wp.YOUR-DOMAIN
                ServerAdmin you@YOUR-DOMAIN
                DocumentRoot /var/www/wp.YOUR-DOMAIN/public_html

                ErrorLog ${APACHE_LOG_DIR}/wp-error.log
                CustomLog ${APACHE_LOG_DIR}/wp-access.log combined

                SSLCertificateFile /etc/ssl/certs/ssl-wp.crt
                SSLCertificateKeyFile /etc/ssl/private/ssl-wp.key
        </VirtualHost>
</IfModule>
Enable SSL site,
a2ensite wp.YOUR-DOMAIN-ssl.conf
Now check whether you can browse the SSL sites in your web browser.
Install Shibboleth Service Provider
Now we will install Shibboleth SP software.
apt install libapache2-mod-shib ntp --no-install-recommends
SP configuration directory should be created at /etc/shibboleth
Configure Shibboleth SP
Now we need to download Federation Metadata Signing Certificate:
cd /etc/shibboleth/
wget https://fr.ac.lk/signedmetadata/metadata-signer -O federation-cert.pem
Edit shibboleth2.xml opportunely.
nano /etc/shibboleth/shibboleth2.xml
Do the modifications as described below.
Change the ApplicationDefaults tag to your domain name.
    <!-- The ApplicationDefaults element is where most of Shibboleth's SAML bits are defined. -->
    <ApplicationDefaults entityID="https://lms.YOUR-DOMAIN/shibboleth"
        REMOTE_USER="eppn subject-id pairwise-id persistent-id"
        cipherSuites="DEFAULT:!EXP:!LOW:!aNULL:!eNULL:!DES:!IDEA:!SEED:!RC4:!3DES:!kRSA:!SSLv2:!SSLv3:!TLSv1:!TLSv1.1">
Modify the SSO tag as below.
            <SSO  discoveryProtocol="SAMLDS" discoveryURL="https://fds.ac.lk">
              SAML2
            </SSO>
Change the MetadataProvider section as well.
        <MetadataProvider type="XML" url="https://fr.ac.lk/signedmetadata/metadata.xml" legacyOrgName="true" backingFilePath="test-metadata.xml" maxRefreshDelay="7200">

                <MetadataFilter type="Signature" certificate="federation-cert.pem" verifyBackup="false"/>

                <MetadataFilter type="RequireValidUntil" maxValidityInterval="864000" />
        </MetadataProvider>
Change the key and certificate fields as given. We will later generate these keys and certificates.
        <!-- Simple file-based resolvers for separate signing/encryption keys. -->
        <CredentialResolver type="File" use="signing"
            key="lms-signing-key.pem" certificate="lms-signing-cert.pem"/>
        <CredentialResolver type="File" use="encryption"
            key="lms-encrypt-key.pem" certificate="lms-encrypt-cert.pem"/>
Add below section just before the </ApplicationDefaults> tag.
        <ApplicationOverride id="wp" entityID="https://wp.YOUR-DOMAIN/shibboleth">
                <CredentialResolver type="File" use="signing"
                        key="wp-signing-key.pem" certificate="wp-signing-cert.pem"/>
                <CredentialResolver type="File" use="encryption"
                        key="wp-encrypt-key.pem" certificate="wp-encrypt-cert.pem"/>
        </ApplicationOverride>
Create SP metadata credentials for both sites:
    /usr/sbin/shib-keygen -n lms-signing -e https://lms.YOUR-DOMAIN/shibboleth
    /usr/sbin/shib-keygen -n lms-encrypt -e https://lms.YOUR-DOMAIN/shibboleth

    /usr/sbin/shib-keygen -n wp-signing -e https://wp.YOUR-DOMAIN/shibboleth
    /usr/sbin/shib-keygen -n wp-encrypt -e https://wp.YOUR-DOMAIN/shibboleth
Now check the shibboleth configuration and restart shibboleth service,
shibd -t /etc/shibboleth/shibboleth2.xml

systemctl restart apache2
systemctl restart shibd
Enable Shibboleth on apache virtual hosts
Now to enable shibboleth login of our install applications we need to modify the relevant configurations files as below.
First for the Moodle application.
cd /etc/apache2/sites-available
nano lms.YOUR-DOMAIN-ssl.conf
<IfModule mod_ssl.c>
        <VirtualHost *:443>

                ServerName lms.YOUR-DOMAIN
                ServerAdmin you@YOUR-DOMAIN
                DocumentRoot /var/www/lms.YOUR-DOMAIN/public_html

                ErrorLog ${APACHE_LOG_DIR}/lms-error.log
                CustomLog ${APACHE_LOG_DIR}/lms-access.log combined


                SSLCertificateFile /etc/ssl/certs/ssl-lms.crt
                SSLCertificateKeyFile /etc/ssl/private/ssl-lms.key

                <Location /moodle>
                           #ShibRequestSetting applicationId mdl
                </Location>

                <Directory /var/www/html/moodle/auth/shibboleth/index.php>
                            AuthType shibboleth
                            #ShibRequestSetting applicationId mdl
                            ShibRequireSession On
                            require valid-user
                </Directory>
        </VirtualHost>
</IfModule>
Then change the Wordpress configuration file.
nano wp.YOUR-DOMAIN-ssl.conf
<IfModule mod_ssl.c>
        <VirtualHost *:443>

                ServerName wp.YOUR-DOMAIN
                ServerAdmin you@YOUR-DOMAIN
                DocumentRoot /var/www/wp.YOUR-DOMAIN/public_html

                ErrorLog ${APACHE_LOG_DIR}/wp-error.log
                CustomLog ${APACHE_LOG_DIR}/wp-access.log combined


                SSLCertificateFile /etc/ssl/certs/ssl-wp.crt
                SSLCertificateKeyFile /etc/ssl/private/ssl-wp.key

                <Location />
                           AuthType Shibboleth
                           ShibRequestSetting requireSession false
                           Require shibboleth
                </Location>
                #Wordpress shibboleth plugin needs requireSession to be false
        </VirtualHost>
</IfModule>
Then enable Shibboleth Apache2 configuration:
    a2enmod shib
    systemctl reload apache2.service
Register both services with LIAF
We have now set up shibboleth SP for two different entities. They have to be registered with LIAF before using the Federation discovery Service to point different IDP's.
Download the metadata from both applications by going to the following URL's.
https://lms.YOUR-DOMAIN/Shibboleth.sso/Metadata
https://wp.YOUR-DOMAIN/Shibboleth.sso/Metadata
Now register them with LIAF separately.
Go to https://liaf.ac.lk/#join and follow the Service provider registration. For the lab we will skip this registration process.
Once the federation operator approves your request you will be sent a SP registration link. In this lab please send these metadata files to lalantha@…. Once metadata file is checked you will be send the SP registration link.
you will be asked to use the content of your metadata file on federation registry registration. You may have to answer several questions describing your service to the federation provider.
Once you registered successfully you have enable the Shibboleth support in the application itself. For that Moodle and Wordpress has pluggins to be enabled and configured.
Enabling Moodle Plugin
As Moodle admin, go to the Site administration >>> Plugins >>> Authentication and click on the Shibboleth enable eye. Next go to its settings.
Fill in the fields of the form.
The fields 'Username', 'First name', 'Surname', etc. should contain the name of the environment variables of the Shibboleth attributes that you want to map onto the corresponding Moodle variable. Especially the 'Username' field is of great importance because this attribute is used for the Moodle authentication of Shibboleth users.
Username: eppn
Moodle WAYF service: No
Shibboleth Service Provider logout handler URL: /Shibboleth.sso/Logout
Data mapping (First name): givenName
Data mapping (Surname): surname
Data mapping (Email address): mail
Update local (Email address): On Creation
Lock value (Email address): Locked
Click Save.
Enabling Wordpress plugin
Install and activate the shibboleth plugin by Michael McNeill, mitcho (Michael 芳貴 Erlewine), Will Norris https://wordpress.org/plugins/shibboleth/
Then go to Settings -> Shibboleth
On General Tab:
Login URL: https://wp.YOUR-DOMAIN/Shibboleth.sso/Login
Logout URL: https://wp.YOUR-DOMAIN/Shibboleth.sso/Logout
Attribute Access: Environment Variables
On User Tab:
Tick Automatically Create Accounts. Check the attribute map as well. If you ticked any attribute Manage tick, user will not be able to change the values once they logged in.
On Authorization Tab:
Select Subscriber as the Default Role.
On Logging Tab:
Enable all Logging.
Click Save.
Now you may browse to https://sp.YOUR-DOMAIN/ and select your preferred IDP to log in.
Attachments (1)
-
web31.png
(38.2 KB
) - added by 3 years ago.
web31
Download all attachments as: .zip