
perfSONAR Bundle Installation
perfSONAR Installation Options
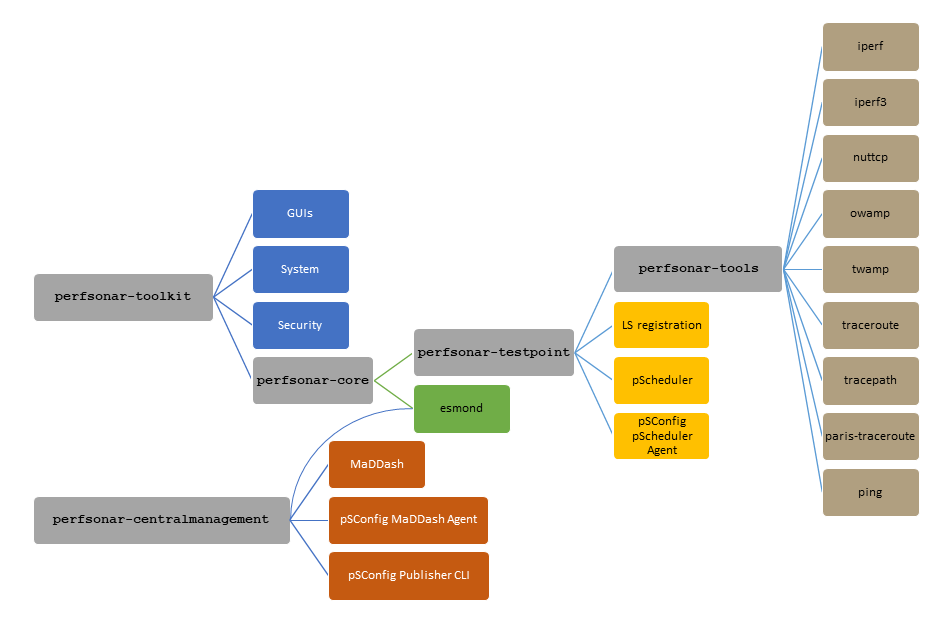
There are five perfSONAR installation options (different packages) in which four of them contains network measurement testing tools and other one contains perfSONAR management tools.
Below graphics shows the relationship between them.

You can find more information on these option from this page.
perfSONAR supports two major linux distributions Centos and Ubuntu/Debian. Currently CentOS 7, Ubuntu 18 and Debian 9 is supported. Other distributions may partially supported or may work but should be installed at your own risk.
In addition, the above different options/packages can be installed using different methods and in different environments docker and virtual machines.
Hardware requirements
The requirements for the perfsonar-core, perfsonar-toolkit, and perfsonar-centralmanagement bundles are a minimum of 2 cores and 4GB of RAM. The perfsonar-testpoint bundle may work with 2GB of RAM, but 4GB is recommended. The clock speed requirements depends on how fast your network is, but we recommend at least 2GHz cores in general, and 2.8GHz or higher if you want to test 10G paths.
While for perfsonar bare-metal installation is allways recommended other options like Virtual machines, Docker containers and cheap hardware options are supported with subject to varying level of success. For more information on hardware options please check this page.
perfSONAR Lab Setup
Please download perfsonar.ova file from the Lab Setup page. Open the Virtual Box and select File => Import Appliance and then select the downloaded file. Then select Continue to next window. There you can see the Apliance settings. You can change the values shown there by selecting the fields. Recommend memory and CPU cores for the perfSONAR are 4096 MB memory and 2 CPU cores. If your host machine has enough resources to cater this please go ahead by increasing the memory to 4096 MB. Then from the MAC Address Policy field select Generate New MAC Addresses for all network adapters. Then select import to finish the importing of the appliance.
Once imported go to settings of the VM and go to Network => Adapter 1. Verify that the Bridge Adapter is selected and also check that the Adapter Name selected is from your Host machine is correct. We prefer Ethernet over Wireless connection for this.
Then start the VM. This VM has already setup below user accounts.
root : NmmLab2022
user : NmmLab2022
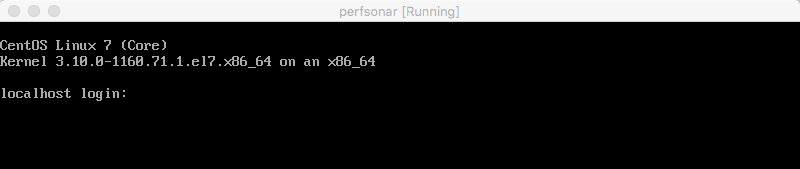
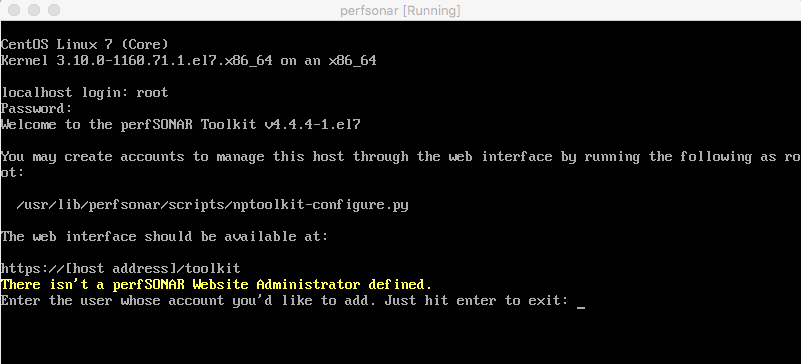
Once boot completed login with the root user.

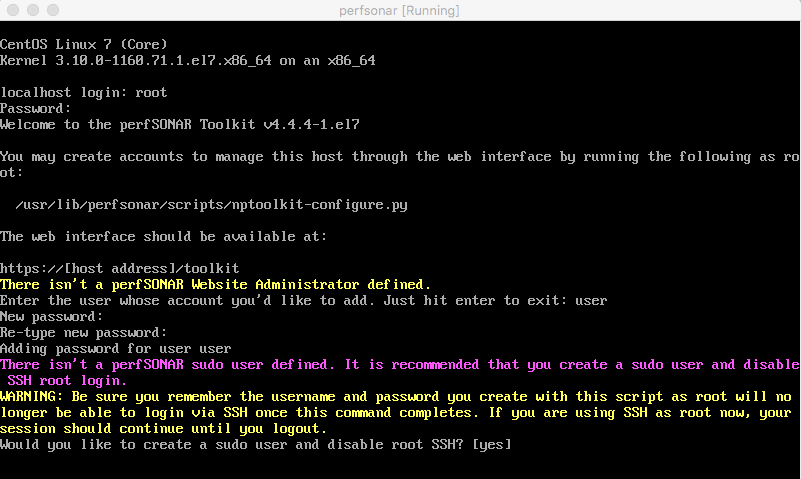
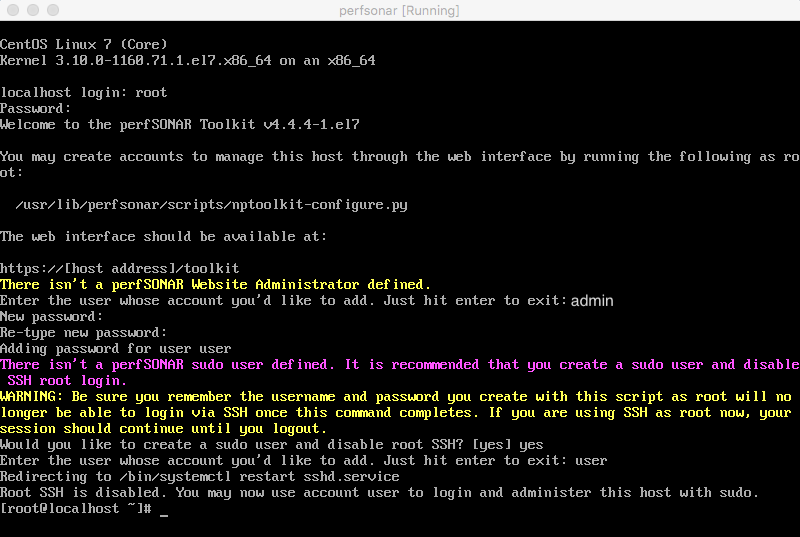
After you log in, you are prompted to add a user ID and password to log into PerfSONAR's web frontend. Make sure to remember your login information.

In next step you're also asked to disable SSH access for root and add a super user instead. Just enter to accept the default selection yes.

This machine already have a user called user. Now enter the username as user so that it will be enabled as a super user to the operating system.

Next step is to configure an IP address and hostname to the operating system. Before that you will have to know the interface names of your server. For that please enter below,
ifconfig

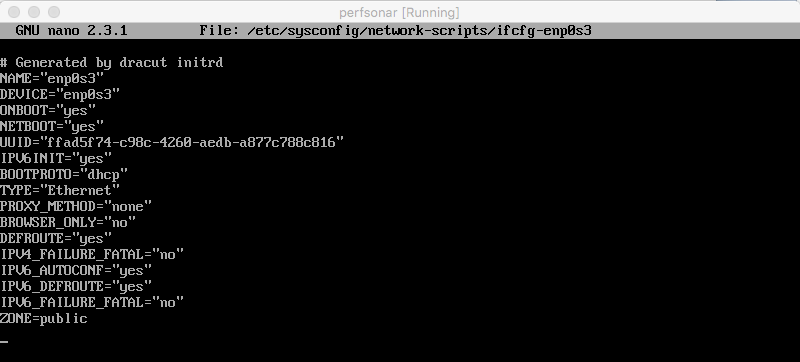
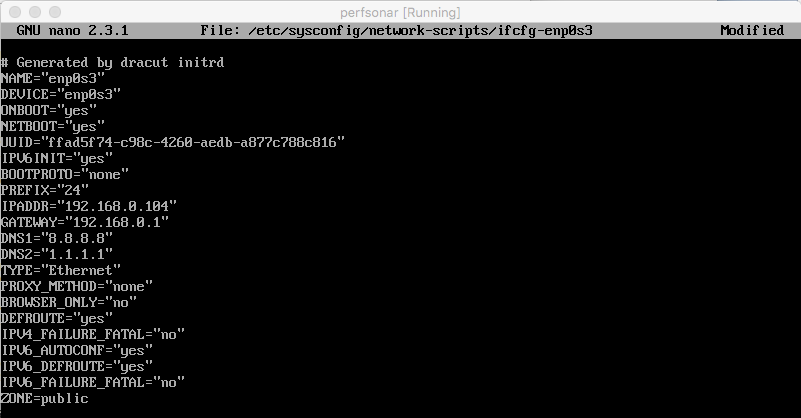
Next using a preferable text editor open the configuration file relevant to the network interface.

Then edit the configuration file something like below. Make sure to set parameter BOOTPROTO to "none" and IPADDR, PREFIX, GATEWAY, DNS1, DNS2 as per your home/office connectivity.

Then restart the system network to make the configuration to take effect.
sudo systemctl restart network
It is a good idea to set a good hostname to the server. Let's to do it using below command and then reboot to take it effect.
sudo hostnamectl set-hostname <hostname.yourdomain>
reboot
Accessing the Web Interface
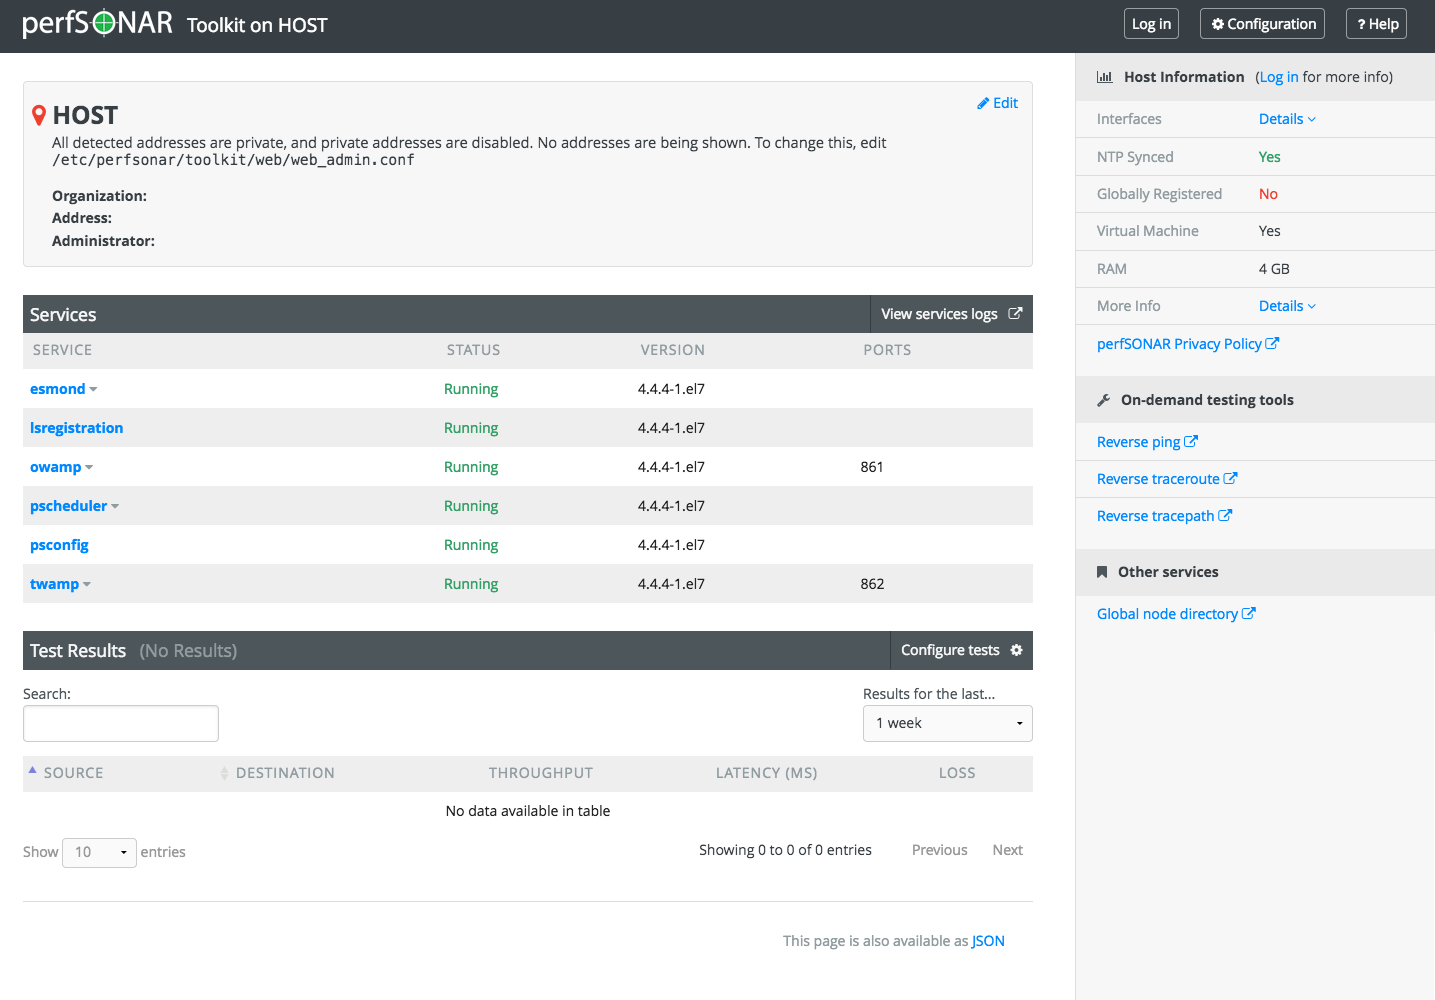
You may access the web interface by typing https://<hostname/ip-address>/toolkit in your web browser. Initial page will be like below.

There are some perfSONAR host configurations to be done before we proceeding with network measurements. For that click on the configuration on top of the page. You will be promted for a user login. Please provide the credentials we created earlier.
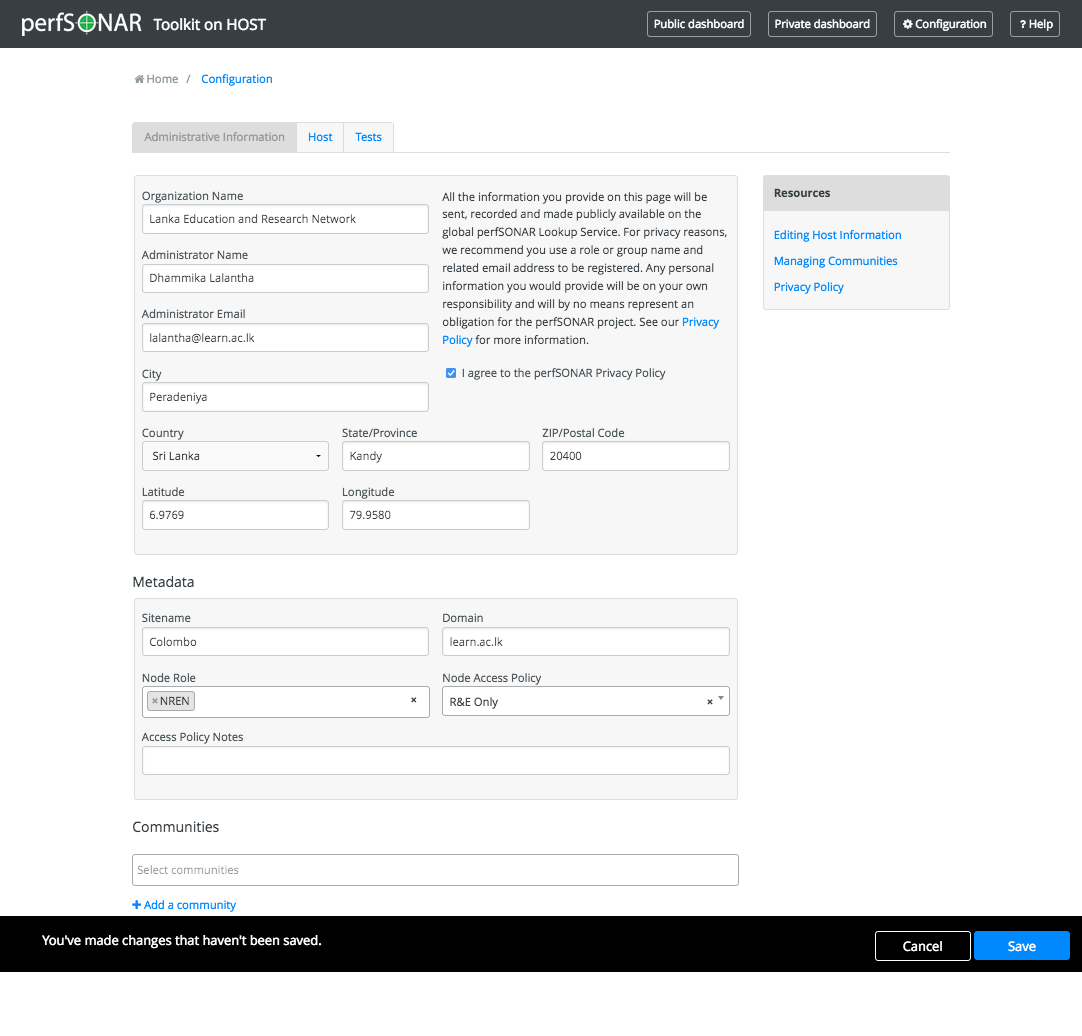
There are three tabs and first we will fill Administrative information. Please fill the fields appropriately and it should be like below. Once done click on Save to apply the configurations.

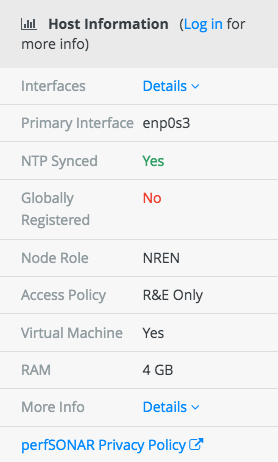
Then go back to the Dashboard and see the Host Information section on the right side. It could be like below.

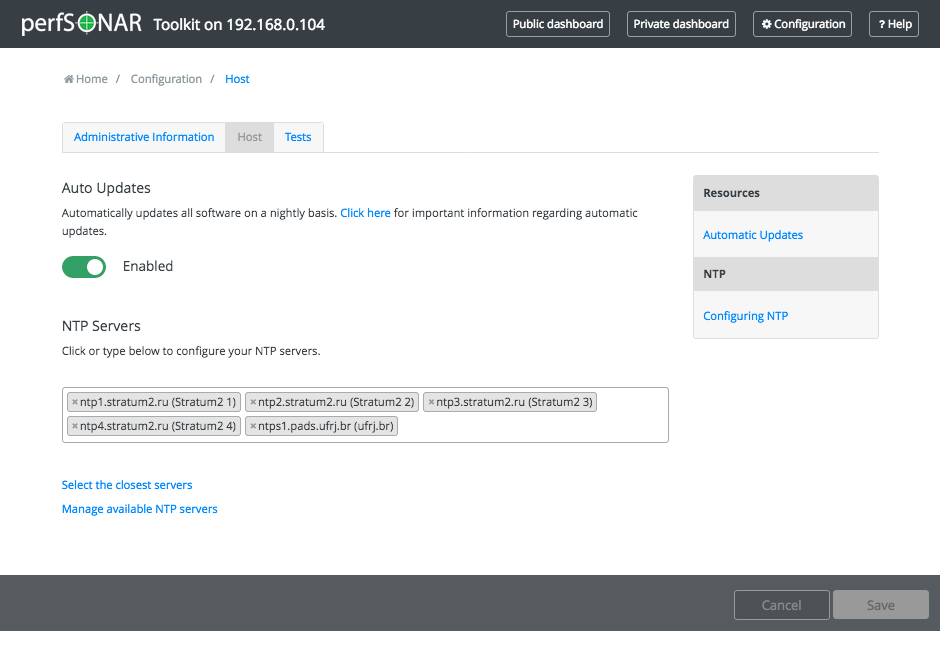
If the NTP Synced is No then go back to Configuration and to the second tab Host. In this tab Network Time Protocol (NTP) servers are configured for the node. Global time syncing is very important to network measurements to be accurate. So we must make sure that NTP Synced status is always Yes.

Click on "Select the closest servers" to update NTP server listed and check again whether NTP Synced status has come to Yes value.
After completing the lab, you should email a screenshot of a configuration file(s) to deepthi@…. Please mention your 'your workshop registration details, session and the session topic' in the email.
Attachments (15)
- ps1.png (40.1 KB ) - added by 4 years ago.
- ps2.png (5.6 KB ) - added by 4 years ago.
- ps3.png (60.2 KB ) - added by 4 years ago.
- ps4.png (70.5 KB ) - added by 4 years ago.
- ps5.png (14.7 KB ) - added by 4 years ago.
- ps6.png (27.2 KB ) - added by 4 years ago.
- ps7.png (38.4 KB ) - added by 4 years ago.
- ps8.png (44.9 KB ) - added by 4 years ago.
- ps9.png (173.4 KB ) - added by 4 years ago.
- ps10.png (28.9 KB ) - added by 4 years ago.
- ps11.png (26.4 KB ) - added by 4 years ago.
- ps12.png (30.2 KB ) - added by 4 years ago.
- ps13.png (145.6 KB ) - added by 4 years ago.
- ps14.png (34.5 KB ) - added by 4 years ago.
- ps15.png (76.8 KB ) - added by 4 years ago.
Download all attachments as: .zip