
| Version 22 (modified by , 5 years ago) ( diff ) |
|---|
Linux Hands - On
Through this hands-on you will install Ubuntu Server on a vm and you will make additional two clones of the installed ubuntu server for your lab sessions in next two days.
(Note down the location of vdi image file when virtualbox flashes it on the screen)
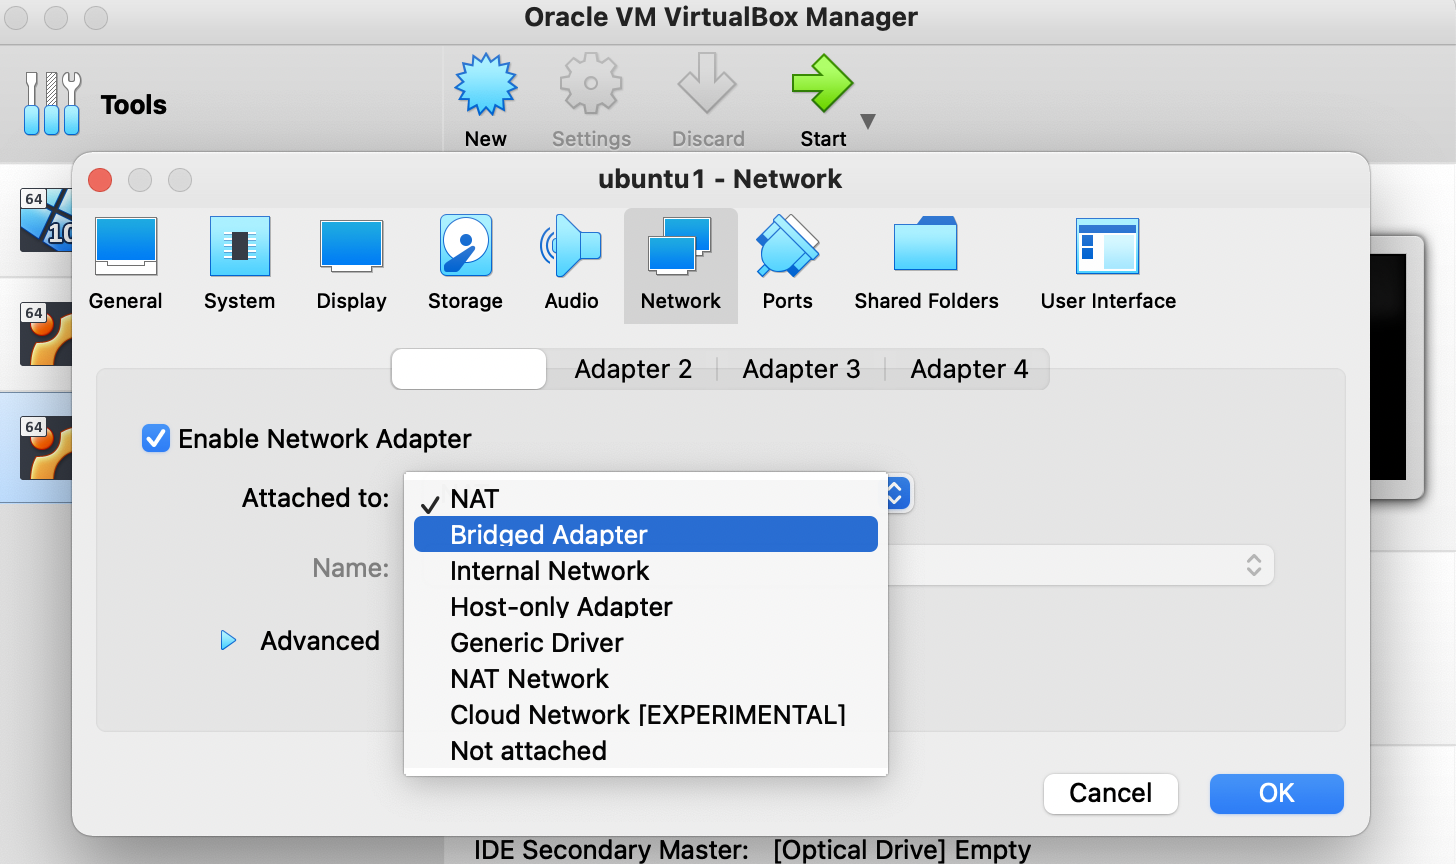
Setting up Network Interface
- Select the VM from left panel on Virtual box, right click and open Settings
- Click on the Network title
- On Adapter 1 While Enable Network Adapter selected choose Attached to be Bride Adapter. This virtual interface will work as the WAN port of the firewall (Can be connect from out side).= Linux Hands - On =
Through this hands-on you will install Ubuntu Server on a vm and you will make additional two clones of the installed ubuntu server for your lab sessions in next two days.
Setting up virtualbox
Installation of virtualbox and Downloading Ubuntu iso image
- Download and install virtualbox 6.x
- https://ubuntu.com/download/server Ubuntu image from the website (Ubuntu Server 20.04.2 LTS)
Creating the VM
- Start virtualbox and Click on New button to create new virtual machine
- Enter name of the VM as: LibreNMS Or iCinga.
- Select OS Type: Linux
- Select Version: Ubuntu (64-bit)
- Then click on Continue button
- Set VM's memory size to 4096MB and click on Continue button
- Set VM's hard disk option to Create a virtual hard disk now and then click on Continue
- Select disk type to VDI
- Select storage type to Fixed size and Continue
- adjust the disk size to 50.0GB and click on Create to create the VM
This might take couple of minutes
(Note down the location of vdi image file when virtualbox flashes it on the screen)
Setting up Network Interface
- Select the VM from left panel on Virtual box, right click and open Settings
- Click on the Network title
- On Adapter 1 While Enable Network Adapter selected choose Attached to be Bride Adapter, then select the name of the network (please select only LAN connection, later it will help you to access switches) This virtual interface will work as the WAN port of the firewall (Can be connect from out side).
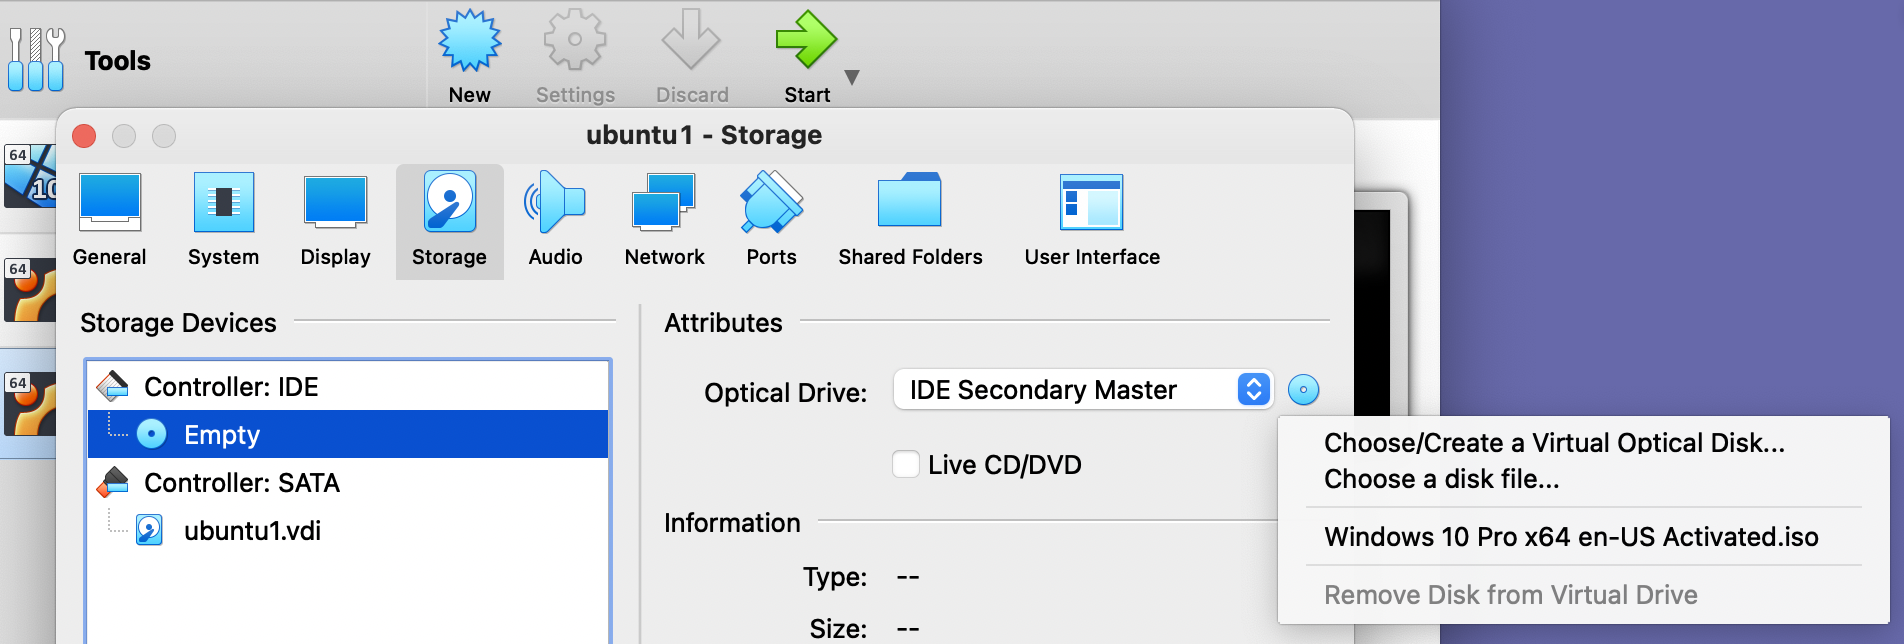
Setting up boot device and Booting
- Click on Storage title and select CD ROM icon with Caption "Empty" under the Controller:IDE, Click on CD ROM icon under the Attribute on the left side to select
- Choose Virtual Optical Disk File
- Locate the Ubuntu CD Image file you downloaded from the above mentioned link. Press OK to close the settings window.
- Right click on VM and select Start to make a Normal Start. You should now see a separate window with Installation screen"

Installation
Initial Installation options
- Select English as language for the installation wizard
- Select Ubuntu Server
- Select English for VM's OS language
- Select location by Others->Asia->Sri Lanka
- Keep locales as default United States
- Press No for configure Keyboard
- Select English (US) for country of origin for the keyboard
Now it might take sometime to detect the hardware and load the necessary Linux modules
Note that it configure network with DHCP
- Type host name as: LibreNMS or iCinga
- When it asked, add a User by entering Your Name, your username, password (Please give a strong password. This VM will be directly exposed to the internet)
- You may select No for not to encrypt home directory
- Select Yes confirm the time-zone
Disk Configuration
Your have 10GB hard drive previously configured for your VM
- Select Manual
- Select the Disk SCSI3(0,0,0) (sda) - 12.0 GB ATA VBOX HARDDISK and Select Yes to create new partition table
- Then select Free Space just below SCSI3(0,0,0) (sda) to create following partitions and mount them as follows.
- Select Create new partition
- Partition size: 512MB ---> Continue
- Type : Primary
- Location : Begining
- Use as : Ext4
- Change Mount point : /boot
- Bootable flag : on
- Select "Done setting up the partition"
- Again select FREE SPACE to create a primary partition for Linux SWAP (two times the RAM) SWAP 2GB
- Partition size:2GB
- Type : Primary
- Location : Begining
- Use as : swap area
- Select "Done setting up the partition"
- Then select Logical Volume Manager and press Yes.
- Select create a Volume Group and name as "linux". When asked select FREE SPACE device (most probably /dev/sda free #1) and select yes for the confirmation
- Go to create logical volumes, select linux, type logical volume name as root, size : 2GB
- Repeat the same Create Logical Volume procedure and make another two volumes as usr and var
- a logical volume name : usr, size : 4GB
- a logical volume name : var, size : rest of the space
These Logical Volumes can be used as partitions containing file system root(/), /usr and /var.
Now you will have 1 Volume Group and 3 Logical Volumes.
- Once you finish creating logical volumes select finish. You will be once again presented with Disk Partition Window.
- Then Select just below the LVM VG linux, LV root - 2.0 GB Linux device-mapper (linear) option and change Use as to Ext4 , Mount point : / and Done.
- Then repeat same for the previous step in usr Volume with following options
- Use as : Ext4
- Mount point : /usr
- Done
- Then repeat same for the previous step in var Volume with following options
- Use as : Ext4
- Mount point : /var
- Done
- Then finish the partitioning and confirm it to write to the disk
Now it might take sometime to install the OS base.
Attachments (2)
- network_bidge_adapter.png (698.7 KB ) - added by 5 years ago.
- storage.png (636.6 KB ) - added by 5 years ago.
Download all attachments as: .zip