
| Version 19 (modified by , 4 years ago) ( diff ) |
|---|
What is a Firewall?
Firewall is a network security system that filters and controls the traffic on a predetermined set of rules. This is an intermediary system between the device and the internet.
How the Firewall of Linux works:
Most of the Linux distro’s ship with default firewall tools that can be used to configure them. We will be using “IPTables” the default tool provided in Linux to establish a firewall. Iptables is used to set up, maintain and inspect the tables of the IPv4 and IPv6 packet filter rules in the Linux Kernel.
iptables Lab
In this lab, you will setup a Basic Firewall Rules with iptables.
Chains :-
Chains are a set of rules defined for a particular task.
We have three chains(set of rules) which are used to process the traffic:-
- INPUT Chains
- OUTPUT Chains
- FORWARD Chains
1. INPUT Chains
Any traffic coming from the internet(network) towards your local machine has to go through the input chains. That means they have to go through all the rules that have been set up in the Input chain.
2. OUTPUT Chains
Any traffic going from your local machine to the internet needs to go through the output chains.
3. FORWARD Chain
Any traffic which is coming from the external network and going to another network needs to go through the forward chain. It is used when two or more computers are connected and we want to send data between them.
Different Policies :-
There are three actions which the iptables can perform on the traffic
1.ACCEPT
2.DROP
3.REJECT
1. ACCEPT
When traffic passes the rules in its specified chain, then the iptable accepts the traffic. That means it opens up the gate and allows the person to go inside the kingdom of Thanos.
2. DROP
When the traffic is unable to pass the rules in its specified chain, the iptable blocks that traffic. That means the firewall is closed.
3. REJECT
This type of action is similar to the drop action but it sends a message to the sender of the traffic stating that the data transfer has failed. As a general rule, use REJECT when you want the other end to know the port is unreachable’ use DROP for connections to hosts you don’t want people to see.
NOTE:-
You need to keep in mind a simple rule here:-
The Rules you set in the iptables are checked from the topmost rules to the bottom. Whenever a packet passes any of the top rules, it is allowed to pass the firewall. The lower rules are not checked. So be careful while setting up rules.
Basic iptables commands :
1.To list the rules of the current iptables:-
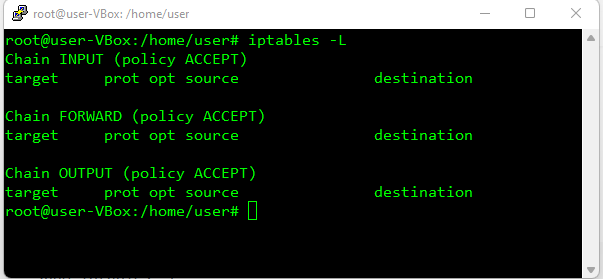
sudo iptables -L
The Output would be:- image
As you can see, we have three chains (INPUT, FORWARD, OUTPUT). We can also see column headers, but they are no actual rules. This is because most of the Linux come with no predefined rules.
Let see what each column mean.
Target:-
This defines what action needs to be done on the packet (ACCEPT,DROP,etc..)
prot:-
This defines the protocol (TCP,IP) of the packet.
source:-
This tells the source address of the packet.
destination:-
This defines the destination address of the packet
2. Clear the rules : If you ever want to clear/flush out all the existing rules. Run the following command:-
sudo iptables -F
This will reset the iptables.
3. Changing the default policy of chains :
sudo iptables -P Chain_name Action_to_be_taken
Making your First Rule :
1. Implementing a DROP rule :
We’ll now start building our firewall policies.We’ll first work on the input chain since that is where the incoming traffic will be sent through.
Syntax:-
sudo iptables -A/-I chain_name -s source_ip -j action_to_take
We’ll take an example to understand the topic.
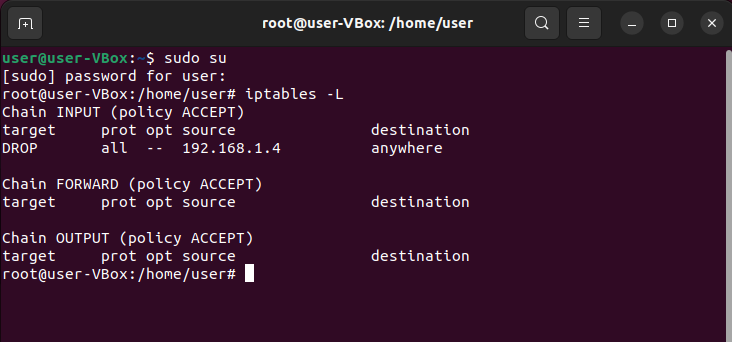
Let’s assume we want to block the traffic coming from an IP address 192.168.1.3. The following command can be used:-
sudo iptables -A INPUT -s 192.168.1.3 -j DROP
This may look complicated, but most of it will make sense when we go over the components:-
-A INPUT :-
The flag -A is used to append a rule to the end of a chain. This part of the command tells the iptable that we want to add a rule to the end of the INPUT chain.
-I INPUT:- In this flag the rules are added to the top of the chain.
-s 192.168.1.3:- The flag -s is used to specify the source of the packet. This tells the iptable to look for the packets coming from the source 192.168.1.3
-j DROP This specifies what the iptable should do with the packet.
In short, the above command adds a rule to the INPUT chain which says, if any packet arrives whose source address is 192.168.1.3 then drop that packet, that means do not allow the packet reach the computer.
Once you execute the above command you can see the changes by using the command:-
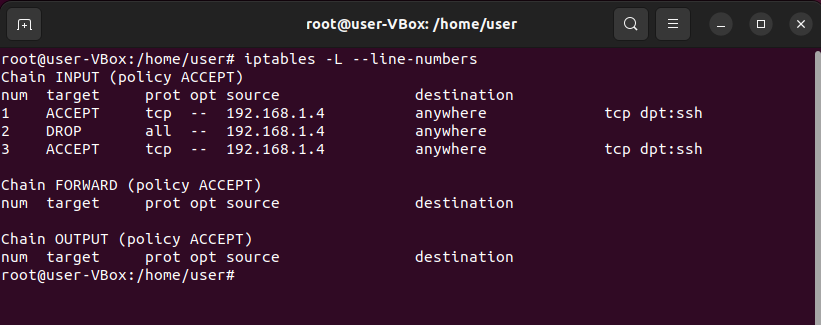
sudo iptables -L
The Output would be:- image
2. Implementing a ACCEPT rule : If you want to add rules to specific ports of your network,then the following commands can be used.
Syntax:-
sudo iptables -A/-I chain_name -s source_ip -p protocol_name --dport port_number -j Action_to_take
-p protocol_name:- This option is used to match the packets that follow the protocol protocol_name.
-dport port_number: This is option is available only if you give the -p protocol_name option. It specifies to look for the packets that are going to the port “port_number”.
Example:-
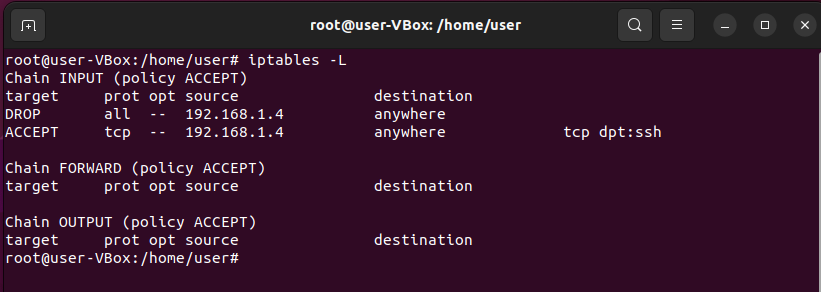
Let’s say we want to keep our SSH port open (we will assume in this guide that the default SSH port is 22) from the 192.168.1.3 network we blocked in the above case. That is we only want to allow those packets coming from 192.168.1.3 and which wants to go to the port 22.
sudo iptables -A INPUT -s 192.168.1.3 -p tcp --dport 22 -j ACCEPT
3. Deleting a rule from the iptable :
Syntax:-
sudo iptables -D chain_name rule_number
Example:-
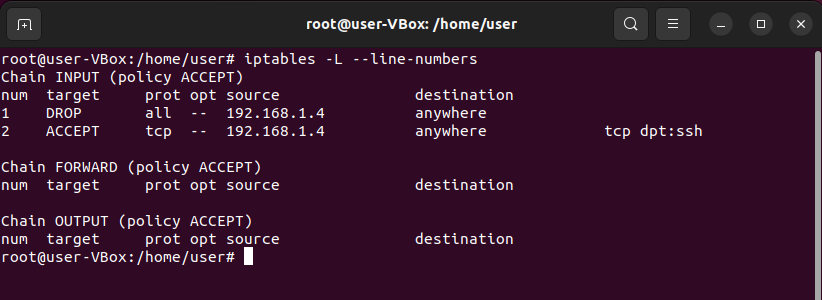
If we want to delete the rule which accepts the traffic to port 22 and which we have added in the previous section, then:-
sudo iptables -D INPUT 1
Remember the rules number starts from 1
4. Saving your configuration : This part is unnecessary if you are implementing it on a personal computer which is not a server, but if you are implementing a firewall on a server, then there are high chances that your server might get corrupted and you might lose all your data. So, it’s always better to save your configurations.
There are a lot of ways to do this, but the easiest way I find is with iptables-persistent package. You can download the package from Ubuntu’s default repositories:
sudo apt-get update
sudo apt-get install iptables-persistent
Once the installation is complete, you can save your configuration using the command:-
sudo invoke-rc.d iptables-persistent save
UFW Lab
Introduction
UFW (uncomplicated firewall) is a firewall configuration tool that runs on top of iptables, included by default within Ubuntu distributions. It provides a streamlined interface for configuring common firewall use cases via the command line.
Verify UFW Status
To check if ufw is enabled, run:
sudo ufw status
Enable UFW
If you got a Status: inactive message when running ufw status, it means the firewall is not yet enabled on the system. You’ll need to run a command to enable it.
sudo ufw enable
You’ll see output like this:
Output
Firewall is active and enabled on system startup
Disable UFW
If for some reason you need to disable UFW, you can do so with the following command
sudo ufw disable
Be aware that this command will fully disable the firewall service on your system.
Block an IP Address
To block all network connections that originate from a specific IP address, run the following command, replacing the highlighted IP address with the IP address that you want to block:
sudo ufw deny from 203.0.113.100
Output
Rule added
In this example, from 203.0.113.100 specifies a source IP address of “203.0.113.100”.
If you run sudo ufw status now, you’ll see the specified IP address listed as denied:
Output
Status: active

To                         Action      From
--                         ------      ----
Anywhere                   DENY        203.0.113.100
Block a Subnet
If you need to block a full subnet, you may use the subnet address as from parameter on the ufw deny command. This would block all IP addresses in the example subnet 203.0.113.0/24:
sudo ufw deny from 203.0.113.0/24
Output
Rule added
Block Incoming Connections to a Network Interface
To block incoming connections from a specific IP address to a specific network interface, run the following command, replacing the highlighted IP address with the IP address you want to block:
sudo ufw deny in on eth0 from 203.0.113.100
The in parameter tells ufw to apply the rule only for incoming connections, and the on eth0 parameter specifies that the rule applies only for the eth0 interface. This might be useful if you have a system with several network interfaces (including virtual ones) and you need to block external access to some of these interfaces, but not all.
Allow an IP Address
To allow all network connections that originate from a specific IP address, run the following command, replacing the highlighted IP address with the IP address that you want to allow access:
sudo ufw allow from 203.0.113.101
If you run sudo ufw status now, you’ll see output similar to this, showing the word ALLOW next to the IP address you just added.
Output
Status: active

To                         Action      From
--                         ------      ----
...
Anywhere                   ALLOW       203.0.113.101
You can also allow connections from a whole subnet by providing the corresponding subnet mask for a host, such as 203.0.113.0/24.
Delete UFW Rule To delete a rule that you previously set up within UFW, use ufw delete followed by the rule (allow or deny) and the target specification. The following example would delete a rule previously set to allow all connections from an IP address of 203.0.113.101:
sudo ufw delete allow from 203.0.113.101
Another way to specify which rule you want to delete is by providing the rule ID. This information can be obtained with the following command:
sudo ufw status numbered
Output
Status: active

     To                         Action      From
     --                         ------      ----
[ 1] Anywhere                   DENY IN     203.0.113.100
[ 2] Anywhere on eth0           ALLOW IN    203.0.113.102
From the output, you can see that there are two active rules. The first rule, with highlighted values, denies all connections coming from the IP address 203.0.113.100. The second rule allows connections on the eth0 interface coming in from the IP address 203.0.113.102.
Because by default UFW already blocks all external access unless explicitly allowed, the first rule is redundant, so you can remove it. To delete a rule by its ID, run:
sudo ufw delete 1
You will be prompted to confirm the operation and to make sure the ID you’re providing refers to the correct rule you want to delete.
Output
Deleting:
 deny from 203.0.113.100
Proceed with operation (y|n)? y
Rule deleted
List Available Application Profiles
Upon installation, applications that rely on network communications will typically set up a UFW profile that you can use to allow connection from external addresses. This is often the same as running ufw allow from, with the advantage of providing a shortcut that abstracts the specific port numbers a service uses and provides a user-friendly nomenclature to referenced services.
To list which profiles are currently available, run the following;
sudo ufw app list
Enable Application Profile
To enable a UFW application profile, run ufw allow followed by the name of the application profile you want to enable, which you can obtain with a sudo ufw app list command. In the following example, we’re enabling the OpenSSH profile, which will allow all incoming SSH connections on the default SSH port.
sudo ufw allow “OpenSSH”
Output
Rule added
Rule added (v6)
Remember to quote profile names that consist of multiple words, such as Nginx HTTPS.
Disable Application Profile
To disable an application profile that you had previously set up within UFW, you’ll need to remove its corresponding rule. For example, consider the following output from sudo ufw status:
sudo ufw status
Output
Status: active

To                         Action      From
--                         ------      ----
OpenSSH                    ALLOW       Anywhere
Nginx Full                 ALLOW       Anywhere
OpenSSH (v6)               ALLOW       Anywhere (v6)
Nginx Full (v6)            ALLOW       Anywhere (v6)
Attachments (6)
- image1.png (14.1 KB ) - added by 4 years ago.
- image2.png (44.0 KB ) - added by 4 years ago.
- image3.png (45.5 KB ) - added by 4 years ago.
- image4.png (43.7 KB ) - added by 4 years ago.
- image5.png (49.1 KB ) - added by 4 years ago.
- image6.png (4.1 KB ) - added by 4 years ago.
Download all attachments as: .zip