
| Version 11 (modified by , 9 years ago) ( diff ) |
|---|
Perfsonar and BWCTL
Setup Perfsonar
Installing perfsonar will take some time. Therefore we will give you a .ova file which you can import to your virtualbox. This will give youa vm with perfsonar installed.
- Please download the .ova file. Note down the location.
- Go to the location where file is downloaded and double click the file.
- You will get a window asking whether you need to import. check the Reinitialize the MAC address of all network cards check box and Click import
- Click agree to the conditions.
- It will take some time to import. After a while you will get a perfsonar instant in your virtulbox.
- Select the VM and click Settings. Go to Network. In adapter 1 Select Bridged Adapter in the Attached to: drop down list. and Select the correct network interface (Which you are using). Click Ok.
- Now start the VM and Log in as root password is <Class Password>.
- Once you log in it will ask you to create a user for web administration. Give the username as admin. Give the password as class password.
- Then it will ask whether you want to disable root ssh log in and create a ssh user. hit enter. Give your name as the username. Give password as <Class Password>.
- Give the following Command. and find out your network interface name
ifconfig
- You will get something like this. Which tells that your interface name is enp0s3
enp0s3: flags=4163<UP,BROADCAST,RUNNING,MULTICAST>  mtu 1500
        inet6 fe80::a00:27ff:fe06:dbb5  prefixlen 64  scopeid 0x20<link>
        ether 08:00:27:06:db:b5  txqueuelen 10000  (Ethernet)
        RX packets 48606  bytes 5307960 (5.0 MiB)
        RX errors 0  dropped 0  overruns 0  frame 0
        TX packets 17461  bytes 1943813 (1.8 MiB)
        TX errors 0  dropped 0 overruns 0  carrier 0  collisions 0
- Now edit the /etc/sysconfig/network-scripts/ifcfg-<Your interface name> and add the following lines. You can find your perfsonar IPv4 and IPv6 Addresses from the table
IPADDR=<Your IP Address>
GATEWAY=192.248.6.254
NETMASK=255.255.255.0
DNS1=192.248.1.161
IPV6ADDR=<Your IPv6 Address>
IPV6_DEFAULTGW=2401:dd00:1032:2::ffff
- Find the following line
BOOTPROTO="dhcp"
and change it to
BOOTPROTO="static"
- Restart network service
systemctl stop NetworkManager
systemctl disable NetworkManager
systemctl restart network
Now you can access the web interface
Web interface
- Open a web browser in your host pc and give the IP address of you perfsonar VM. You will get the perfsonar toolkit.
- Log in to the toolkit by by clicking the log in button. Give username as admin and password as <Class Password>
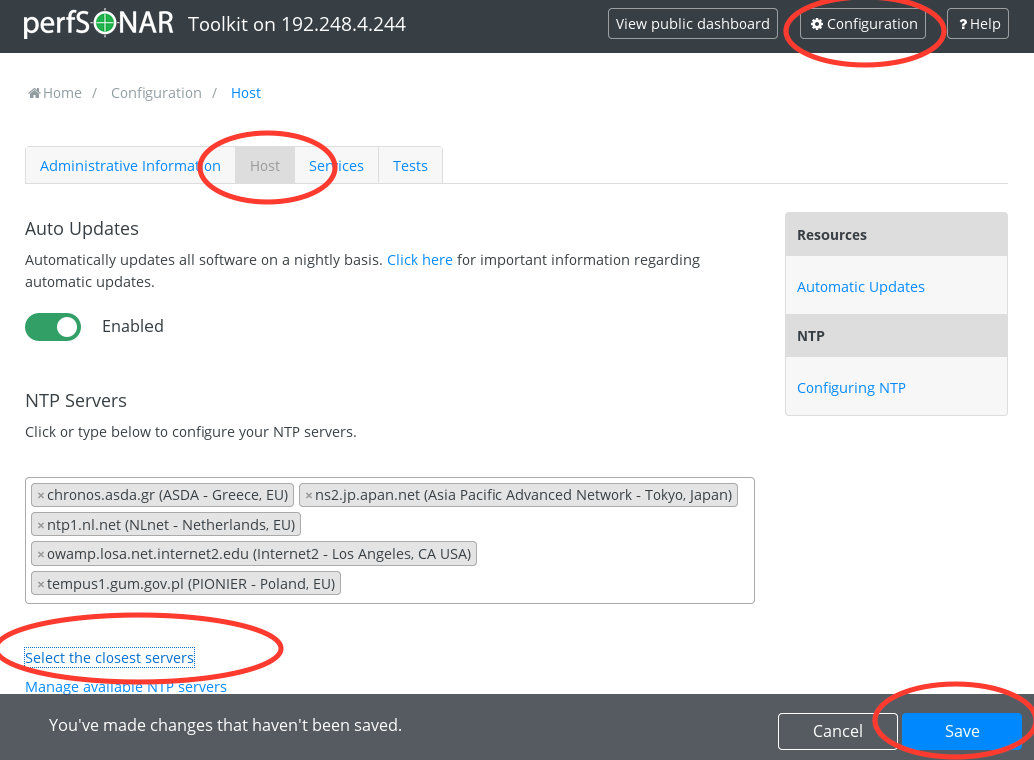
- Let set up the NTP. To do that, Click Configure button and Click the Host. Click the Select the closest servers and it will show you some closest servers. Click Save.

- Then Let's configure server details. Click the Administrative Information. Fill the following details. and Click Save
-- Organization Name : LEARN
-- City : Peradeniya
-- Country : Sri Lanka
-- State/Province : Kandy
-- !ZIP/Postal Code : 22000
-- Administrator Name : <your Name>
-- Administrator Email : <Your E mail>
-- Node Role : NREN
-- Node Access Policy : Private
-- Communities : LEARN
Testing with Perfsonar
Lets do a ping test with perfsonar.
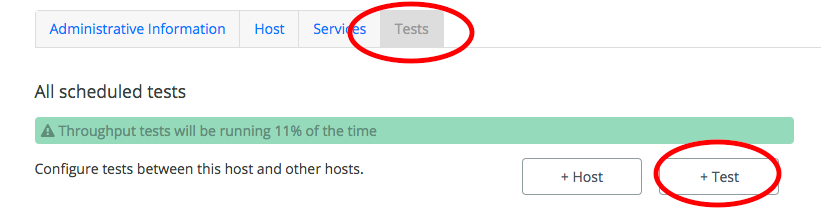
- First Click Configure and click Test tab.
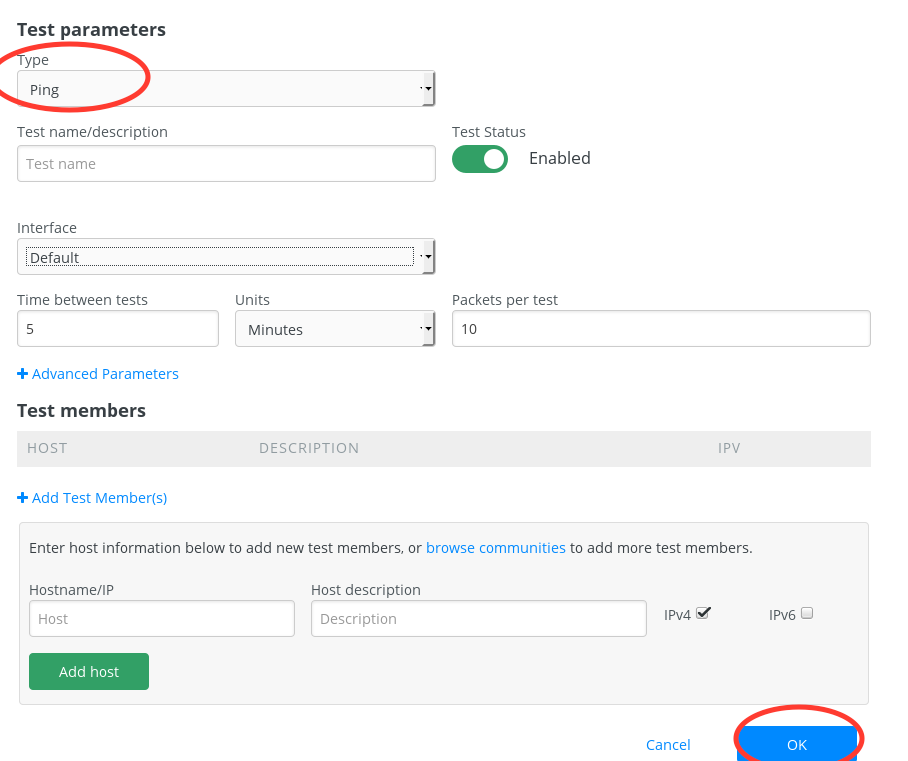
- Then Click +Test button and you will get the Test parameters page .

- Select ping from Type drop down list.
- Set the following details
- Test name/description : Test with <Neighbor IP>
- Interface : Default
- Time between tests : 5
- Units : minutes
- Packets per test : 10
- Hostname/IP : <Your Neighbor's IP Address>
- Host description : <Neighbor's Name>
- Click Ok

- Click Save
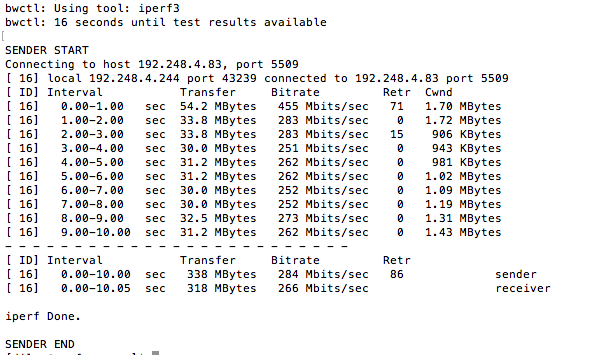
- You will the created test now appears in dashboard. Check for the values.
Attachments (4)
- ps1.png (102.7 KB ) - added by 9 years ago.
- ps2.png (67.5 KB ) - added by 9 years ago.
- ps3.png (59.8 KB ) - added by 9 years ago.
- ps4.png (37.7 KB ) - added by 9 years ago.
Download all attachments as: .zip
Note:
See TracWiki
for help on using the wiki.