
| Version 26 (modified by , 9 years ago) ( diff ) |
|---|
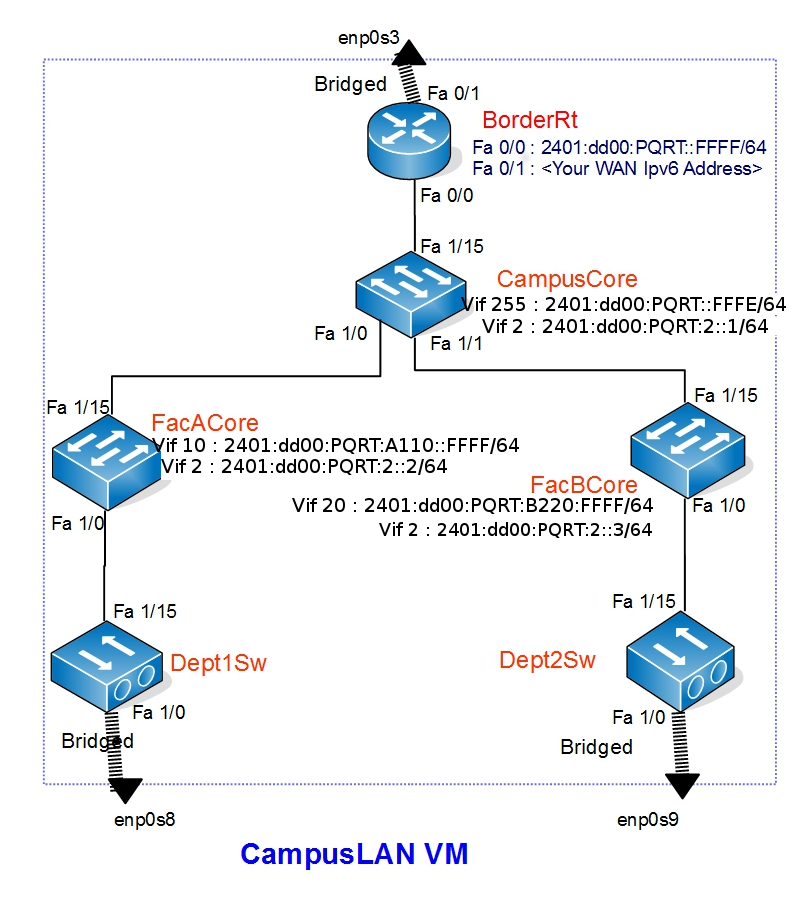
Device Configuration (Dual Stack/IPv6)
As our network is working well in IPv4 mode lets enable dual stack. This is very easy as its only configuring the interface IP addresses and IPv6 routing.

You can refer the following table for assign Interface IPv6 addresses. In the following IPv6 addresses replace the PQRT segment with the IPv6 block assign to you. You can find your IP block from here.
VLAN | VLAN Name | Device Name | VLAN Interface IPnsrc dynagen recovery |
|---|---|---|---|
2 | Core | CampusCore | 2401:dd00:PQRT:2::1/64 |
FacACore | 2401:dd00:PQRT:2::2/64 | ||
FacBCore | 2401:dd00:PQRT:2::3/64 | ||
10 | Dept1 | FacACore | 2401:dd00:PQRT:A110::FFFF/64 |
Dept1PC | no interface IP | ||
20 | Dept2 | FacBCore | 2401:dd00:PQRT:B220::FFFF/64 |
Dept2PC | no interface IP | ||
255 | Router Connection/Public IP | CampusCore | 2401:dd00:PQRT::FFFE/64 |
Initial Configurations
As we have done most of our configurations before setting up IPv4, Only configuration left is adding IPv6 DNS. Use the following command in all Core Devices and the Router (No need to add this in Dept1Sw & Dept2Sw)
ip name-server 2401:DD00:1::161
Core Network Layer
First Configure the CampusCore with IPv6 addresses and then move in to FacACore and FacBCore.
CampusCore
- Login to CampusCore device. Give your console port password (class password)
- Go to config mode from user mode. Give your enable password (class password)
- Assign the IPv6 Address to the VLAN interface
CampusCore(config)#interface vlan 2
CampusCore(config-if)# ipv6 address 2401:dd00:PQRT:2::1/64
CampusCore(config-if)# exit
CampusCore(config)#interface vlan 255
CampusCore(config-if)# ipv6 address 2401:dd00:PQRT::FFFE/64
CampusCore(config-if)# exit
- Next we have to configure unicast routing in the Switch
CampusCore(config)#ipv6 unicast-routing
- Make sure you save the configurations to start-up
Then we will configure FacACore with it's IPv6 Addresses
FacACore
- Login to FacACore device. Give your console port password (class password)
- Go to config mode from user mode. Give your enable password (class password)
- Assign the IP Address to the VLAN interface and enable unicast routing
FacACore(config)#interface vlan 2
FacACore(config-if)#ipv6 address 2401:dd00:PQRT:2::2/64
FacACore(config-if)#exit
FacACore(config)#interface vlan 10
FacACore(config-if)#ipv6 address 2401:dd00:PQRT:A110::FFFF/64
FacACore(config-if)#exit
FacACore(config)#ipv6 unicast-routing
FacACore(config)#exit
FacACore#write
FacBCore
- Repeat same to configure FacBCore
FacBCore(config)#interface vlan 2
FacBCore(config-if)#ipv6 address 2401:dd00:PQRT:2::3/64
FacBCore(config-if)#exit
FacBCore(config)#interface vlan 20
FacBCore(config-if)#ipv6 address 2401:dd00:PQRT:B220::FFFF/64
FacBCore(config-if)#exit
FacBCore(config)#ipv6 unicast-routing
FacBCore(config)#exit
FacBCore#write
- Finally Verify the connectivity
- Go to FacACore device
- Go to privileged mode and ping CampusCore and FacBCore
ping 2401:dd00:PQRT:2::1
ping 2401:dd00:PQRT:2::3
- You should get a positive reply with "!!"
PC Auto Configuration
Log in to your Dept1PC and check its IP address by issuing ifconfig in console. You may notice that there is a new IPv6 address auto configured with the VLAN 10 prefix.
- You were already capturing some packets on wireshark with icmpv6 filter. Go to wireshark
- You will see neighbor solicitation packets coming to your PC
- Try ping IPv6 gateway
ping6 2401:dd00:PQRT:A110::FFFF
- you will get a positive result
Check the same with Dept2PC. But now it should show an address from VLAN 20 prefix. Check connectivity by ping6 VLAN20 interface ipv6 address.
Now let's configure a static IPv6 address for Dept2PC
- go to Dept2PC and edit /etc/network/interfaces file
vi /etc/network/interfaces
- Find the following line
iface enp0s3 inet6 auto
- Replace the line with following
iface enp0s3 inet6 static
address 2401:DD00:<PQRT>:B220::1
netmask 64
gateway 2401:DD00:<PQRT>:B220::FFFF
- Reboot the machine
- After the reboot ping6 to IPv6 Gateway
Connecting LAN to the Router
Now you have done LAN interface configuration. Let's start routers Configuration.
- Login to BorderRt Router and switch to config mode
- Router's IP allocation is as follows. You can get your Router's IP address from here.
| Interface Name | IP Address |
|---|---|
| Fast Ethernet 0/0 | 2401:dd00:PQRT::FFFF/64 |
| Fast Ethernet 0/1 | <Your Routers WAN IPv6> |
- Let's configure the LAN port (fa 0/0)
BorderRt(config)#interface fastEthernet 0/0
BorderRt(config-if)#ipv6 address 2401:dd00:PQRT::FFFF/64
BorderRt(config-if)#exit
- Configure the WAN port (fa 0/1)
BorderRt(config)#interface fastEthernet 0/1
BorderRt(config-if)#ipv6 address 2401:dd00:1:128::XXXX/64
BorderRt(config-if)#exit
BorderRt(config)#ipv6 unicast-routing
BorderRt(config)#exit
BorderRt#write
- You have successfully finished connecting CampusCore to the BorderRt router. Let's verify the connectivity using the ping command
- Go to BorderRt and ping to CampusCore switch's VLAN 255 Interface IP
ping 2401:dd00:PQRT::FFFF
- Now Check the routers connectivity in WAN port. Ping to the WAN Gateway
ping 2401:DD00:1:128::FFFF
- Both these ping commands should give you a reply
Routing
In this Lab we will enable OSPF for IPv6 in all the core switches and we will add default routes in !Campuscore and the router.
- Now let's enable OSPF on Core devices. Starting from CampusCore
- Login to CampusCore? switch and switch to config mode
- Define OSPF process and Process ID. In this lab use process ID as 1
CampusCore(config)#ipv6 router ospf 1
- Give the router ID, this will be the same as ipv4 ospf router ID for simplicity
CampusCore(config-rtr)#router-id 10.0.2.1
- You are going to announce the subnets which are directly connects to you. Use this command for that
CampusCore(config-rtr)#redistribute connected
- You are enabling OSPF on VLAN 2. Use this command for that.
CampusCore(config)#interface vlan 2
CampusCore(config-if)# ipv6 ospf 1 area 2
CampusCore(config-if)# exit
- Now you have enable OSPF on CampusCore Switch. Now lets add the default Route.
CampusCore(config)# ipv6 route ::/0 2401:dd00:PQRT::FFFF
- Follow the same steps in FacACore and FacBCore
- Some troubleshooting commands
- You can get the IPv6 routing table by following
Router#show ipv6 route
- To get OSPFv3 routes
Router#show ipv6 route ospf
- To get ospf neighbors
Router#show ipv6 ospf neighbor
- To restart ospf neighbors
Router#sclear ipv6 ospf process
- You can get the IPv6 routing table by following
FacACore
FacACore(config)#ipv6 router ospf 1
FacACore(config-rtr)#router-id 10.0.2.2
FacACore(config-rtr)#redistribute connected
FacACore(config-rtr)#exit
FacACore(config)#interface vlan 2
FacACore(config-if)# ipv6 ospf 1 area 2
FacACore(config-if)# exit
FacACore(config)#ipv6 route ::/0 2401:dd00:PQRT:2::1
FacBCore
FacBCore(config)#ipv6 router ospf 1
FacBCore(config-rtr)#router-id 10.0.2.3
FacBCore(config-rtr)#redistribute connected
FacBCore(config-rtr)#exit
FacBCore(config)#interface vlan 2
FacBCore(config-if)# ipv6 ospf 1 area 2
FacBCore(config-if)# exit
FacBCore(config)#ipv6 route ::/0 2401:dd00:PQRT:2::1
- Now you have enable Routing in your Core network. Let's verify whether it is working.
- Go to Dept1PC and try a Ping6 to Dept2PC. You get get the auto configured IPv6 address of the Dep2tPC by ifconfig command
- It should give you a reply
- Add the BorderRt Routers default gateway
- Go to BorderRt and switch to config mode
- Add the default route
- BorderRt(config)# ipv6 route ::/0 2401:DD00:1:128::FFFF
- Verify the route by ping a known host from the BorderRt router
ping 2401:dd00:1::161
- This should give you a reply
Router Configuration
Here we need no NAT to access internet, only dependency is the correct routing details.
- Login to BorderRt Router and switch to config mode
- Add a static route in the router so that the traffic coming to our defined network will redirect to CampusCore switch
BorderRt(config)#ipv6 route 2401:dd00:PQRT::/48 2401:dd00:PQRT::FFFE
- Now try a ping from DeptPC1 to the 2401:dd00:1::161 . It should give reply
Wireshark
Let's capture some packets and do a analysis.
- Log in to Dept1PC and and start blackbox.
sudo startx
- Right click on desktop and open xterm terminal
- type wireshark and press enter
- On the wireshark interface select the enp0s3 interface and click Capture packets button
- While you are capturing. Open another xterm terminal. And type midori and press enter.
- You will get midori browser. Click the arrow head at top right corner to get the menu. In the menu select New Private Browsing Window
- Browse for www.google.com from the browser.
- Go back to wireshark and stop capturing
- Click on Statistics and select Summary
- You will see high percentage of IPv6 packets
- Try for some other popular sites
HTTP on IPv6
Your Dept1PC and Dept2PC were unaccessible from the outside network when you are using IPv4 only. Let's see if it is the same with IPv6. We have configure lighttpd in Dept2PC which is a light weight web server. Lest see whether you can access it from outside.
- Go to Dept2PC and edit the /var/www/html/index.html
vi /var/www/html/index.html
- Find PQRST and replace it with your Institute Name
- Save and exit the file
- Open a web browser in your host machine (Your windows or MAC)
- Type http://[2401:dd00:<PQRT>:b220::1]
- You should get a web page.
Attachments (1)
- IPv6.jpg (335.6 KB ) - added by 9 years ago.
Download all attachments as: .zip