
| Version 34 (modified by , 4 years ago) ( diff ) |
|---|
Network Device Configuration Management - Oxidized
In this lab, you will install and configure Oxidized and integrate it with LibreNMS. When you are changing users, always start from root. You may use exit to logout current user. When you are coping the commands, copy and execute line by line. Otherwise, you may get errors and worst case, have to start from the beginning.
Requirements:
- Completed network setup of https://ws.learn.ac.lk/wiki/Cnbp2022/Agenda/LabSetup (Download WKFiles files from this link and replace WKFiles with it in your setup https://docs.learn.ac.lk/index.php/s/S2n5VymHTzQiZzS)
- Configured PFsense VM. If PFsense in your setup is incomplete, replace it with this VM and adjust network configurations if required. We recommend using the wired network as much as possible. https://docs.learn.ac.lk/index.php/s/xNKnIMShvRdUFWV
- Ubuntu 20.04 Server with LibreNMS installed (Use this provided VM to replace Monitoring_Server in your setup https://docs.learn.ac.lk/index.php/s/yWmI7pZCIV8lf9o)
- Gmail account with 2-Step Verification On.
Oxidized Installation
Login/SSH to LibreNMS VM (10.1.5.10) (username:user & password:1234) from WinXP_INSIDE. Since most of the tasks in this lab require you to be "root", the first thing you should do is to connect to your server and start a root shell.
sudo su
apt update
apt-get install ruby ruby-dev libsqlite3-dev libssl-dev pkg-config cmake libssh2-1-dev libicu-dev zlib1g-dev g++
sysctl -w net.ipv6.conf.all.disable_ipv6=1
sysctl -w net.ipv6.conf.default.disable_ipv6=1
sysctl -w net.ipv6.conf.lo.disable_ipv6=1
gem install oxidized
gem install oxidized-script oxidized-web
You may run oxidized command (below last command) 2 to 3 times to generate all configurations. It is recommended not to run oxidized as root.
useradd -s /bin/bash -m oxidized
su - oxidized
oxidized
LibreNMS Integration
Create Token as follows
Login to LibreNMS (username & password:admin) web GUI (10.1.5.10) using WinXP_INSIDE.
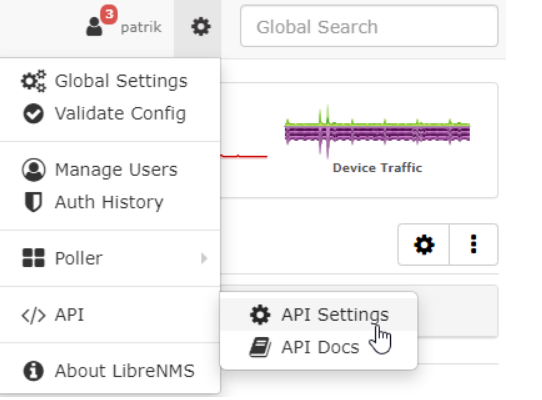
Go to Settings -> API Settings

Click on 'Create API access token'.

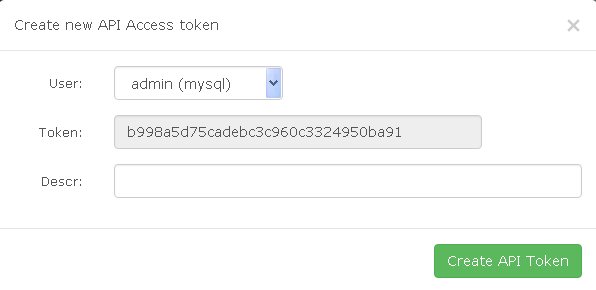
Click 'Create API Token'.
Login to CLI as libreNMS user and continue.
sudo su - librenms
lnms config:set oxidized.enabled true
lnms config:set oxidized.url http://127.0.0.1:8888
lnms config:set oxidized.features.versioning true
lnms config:set oxidized.group_support true
lnms config:set oxidized.default_group f
Oxidized Configuration
Open oxidized main configuration file.
su - oxidized
nano .config/oxidized/config
Change the configuration file by adding / updating the following information. Replace oxidizedfor (gmail) and 09db454fb0ec6927c777e214c2f82d60 (LibreNMS token value) with your corresponding values. Interval value (in seconds) is the auto refresh interval (you can change that one).
---
username: username
password: password
model: ios
resolve_dns: false
interval: 300
use_syslog: false
debug: false
threads: 30
timeout: 20
retries: 3
prompt: !ruby/regexp /^([\w.@-]+[#>]\s?)$/
rest: 127.0.0.1:8888
next_adds_job: false
vars:
  enable: '123'
groups: {}
models: {}
pid: "/home/oxidized/.config/oxidized/pid"
crash:
  directory: "/home/oxidized/.config/oxidized/crashes"
  hostnames: false
stats:
  history_size: 10
input:
  default: telnet, ssh
  debug: false
  ssh:
    secure: false
  ftp:
    passive: true
  utf8_encoded: true
output:
  default: git
  git:
    user: Oxidized
    email: oxidizedfor@gmail.com
    repo: "~/.config/oxidized/oxidized.git"
source:
  default: http
  debug: true
  http:
    url: http://127.0.0.1/api/v0/oxidized
    map:
      name: hostname
      model: os
      group: group
    headers:
      X-Auth-Token: '09db454fb0ec6927c777e214c2f82d60'
groups:
  f:
    username: 'cisco'
    password: '123'
hooks:
  email_output:
    type: exec
    events: [post_store]
    cmd: '/home/oxidized/.config/oxidized/oxidized-report-git-commits -s "Oxidized updates for ${OX_NODE_NAME}" -r oxidizedfor@gmail.com'
    async: true
    timeout: 120
Create oxidized-report-git-commits file.
nano .config/oxidized/oxidized-report-git-commits
Copy the following content to the file and save it.
#!/bin/sh
trap '/bin/rm -f "$tmpfile"' EXIT

tmpfile=$(mktemp) || exit 1

subject="Oxidized updates for ${OX_NODE_NAME}"
scriptname=`basename $0`

usage()
{
    echo "Usage: ${scriptname} [-f] [ -s email_subject ] [ -r email_recipient ]"
    exit 1
}

email_on_gitfail=1
while getopts "fs:r:" opt; do
    case $opt in
        s)
            subject=$OPTARG
            ;;
        r)
            recipient=$OPTARG
            ;;
        f)
            email_on_gitfail=0
            ;;
        *)
            usage
            ;;
    esac
done


if [ "${OX_EVENT}" = "node_fail" ]; then
    echo "${scriptname}: ${OX_NODE_NAME}": 'Job failed'
    exit 64
fi

if [ -z "${OX_REPO_COMMITREF}" ]; then
        echo "${scriptname}: "'$OX_REPO_COMMITREF not set'
        exit 64
fi

if [ -z "${OX_REPO_NAME}" ]; then
        echo "${scriptname}: "'$OX_REPO_NAME not set'
        exit 64
fi

cat > ${tmpfile} <<EOF
Node name: ${OX_NODE_NAME}
Group name: ${OX_NODE_GROUP}
Job status: ${OX_JOB_STATUS}
Job time: ${OX_JOB_TIME}
Git repo: ${OX_REPO_NAME}
Git commit ID: ${OX_REPO_COMMITREF}

EOF

# test if commit exists
git --bare --git-dir="${OX_REPO_NAME}" rev-parse --quiet --verify "${OX_REPO_COMMITREF}" > /dev/null 2>&1
gitret=$?

if [ ${gitret} -eq 0 ]; then
    git --bare --git-dir="${OX_REPO_NAME}" show --pretty='' --no-color "${OX_REPO_COMMITREF}" >> ${tmpfile} 2>&1
else
    echo "${scriptname}: commit ${OX_REPO_COMMITREF} does not exist" >> ${tmpfile}
fi

if [ ! -z "${recipient}" -a \( ${gitret} -eq 0 -o ${email_on_gitfail} -eq 1 \) ]; then
    cat ${tmpfile} | mail -s "${subject}" "${recipient}"
else
    cat ${tmpfile}
fi
Give execution privileges.
chmod +x .config/oxidized/oxidized-report-git-commits
Setup Oxidized Service
Run the following commands as root user.
cp /var/lib/gems/2.7.0/gems/oxidized-0.28.0/extra/oxidized.service /etc/systemd/system
mkdir /run/oxidized
chown oxidized:oxidized /run/oxidized
systemctl enable oxidized.service
Start oxidised service
systemctl start oxidized
View status of oxidised service
systemctl status oxidized
Login to LibreNMS GUI by browsing 10.1.5.10 in the web using WinXP_INSIDE.
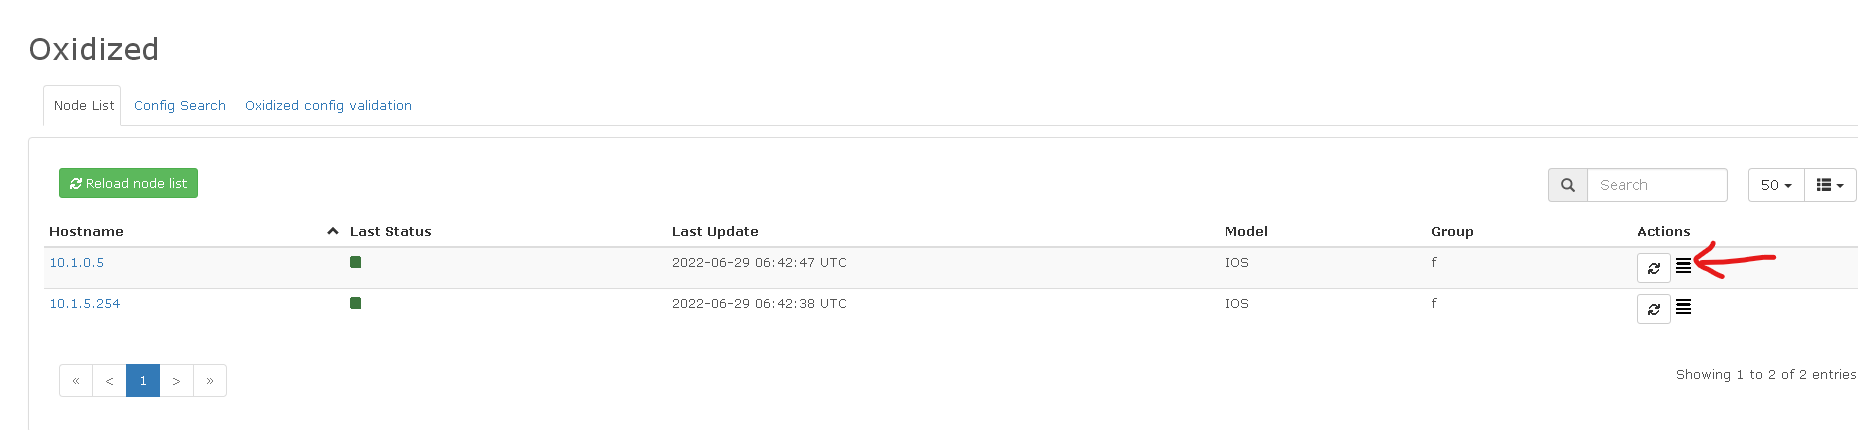
Oxidized can be accessed as in the following.

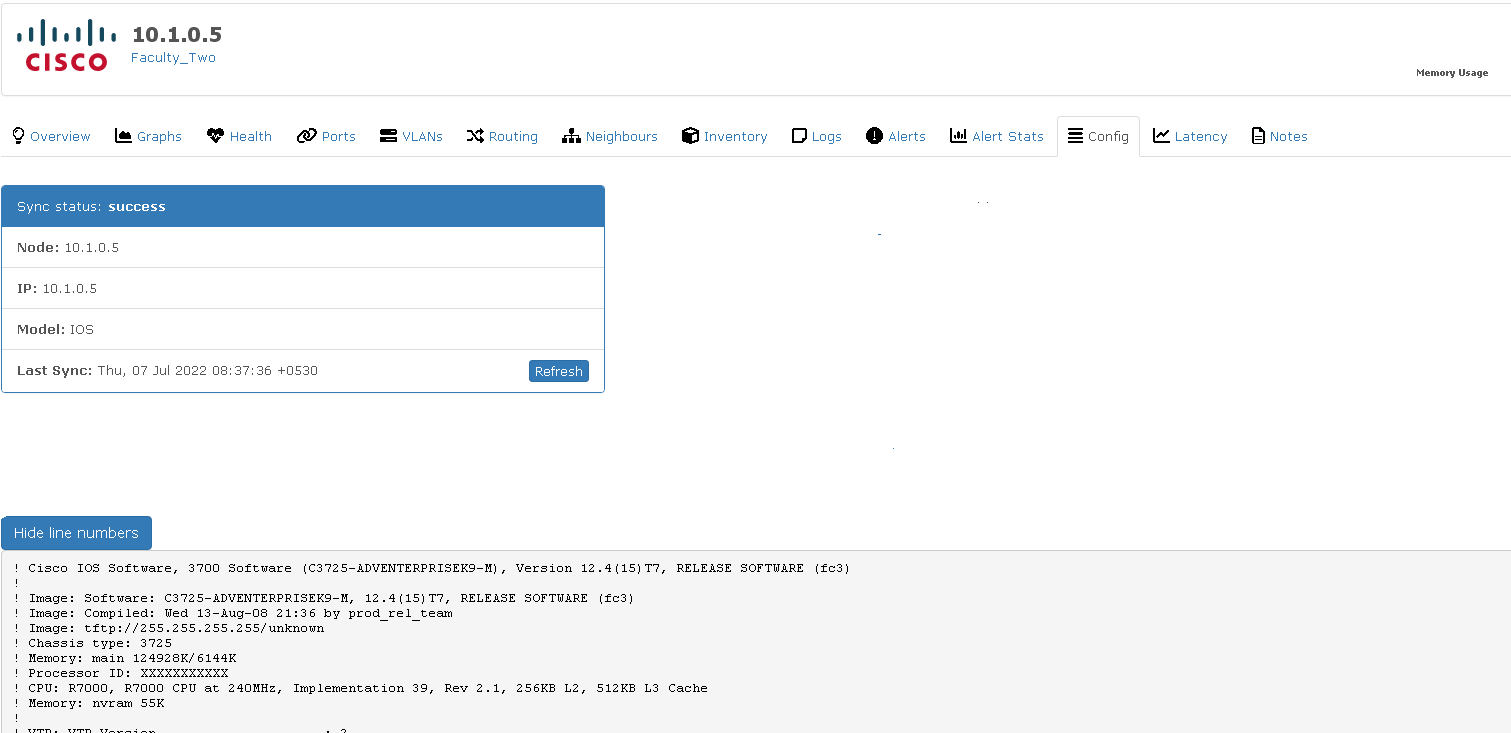
A device configuration can be accessed by clicking the icon (see the below red arrow).

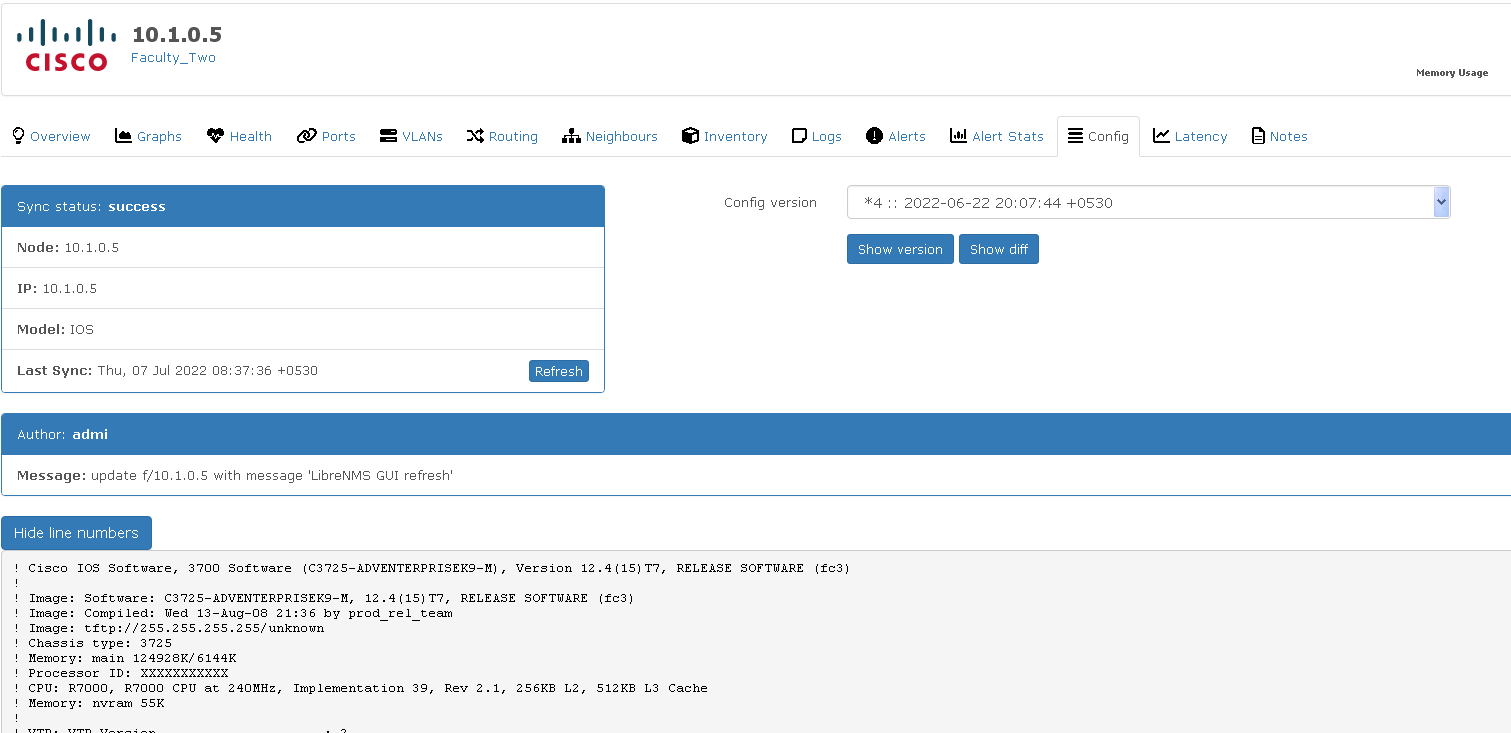
The resulting screen will be as below or similar.

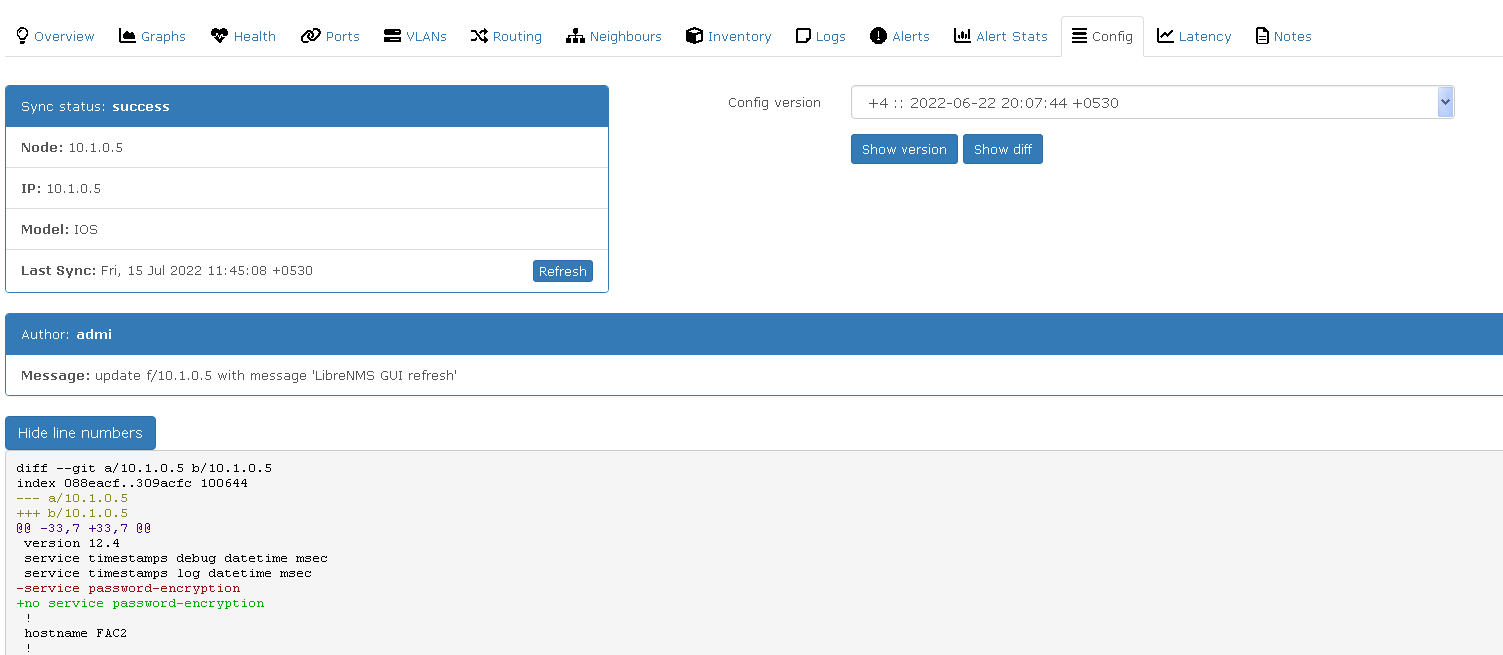
You can view Show version and Show diff buttons if there are configuration changes/ changing history, after Oxidized has connected with the devices. Try to get that screen by changing a configuration and saving that of a connected device. All device passwords are 123. You may refer this https://ws.learn.ac.lk/wiki/Cnbp2022/Agenda/NetworkSetup
The default output will be Show version.

Click Show diff. Below Hide line numbers a minus (-) mark in front of the command says that particular command is reverted (red). And a plus (+) mark in front of the command says the reverted command is replaced by it (green).

Postfix Installation
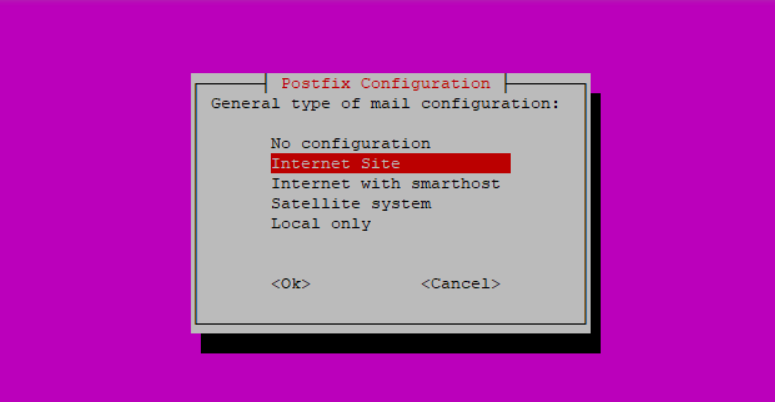
Postfix will be installed to have an email notification of configuration changes. Run the following commands as root user.
apt install postfix
Select Internet Site (default option) to enable Postfix to sent and receive mails and press Enter to proceed.

Put oxidized.learn.com for System mail name and proceed.

Gmail Configuration
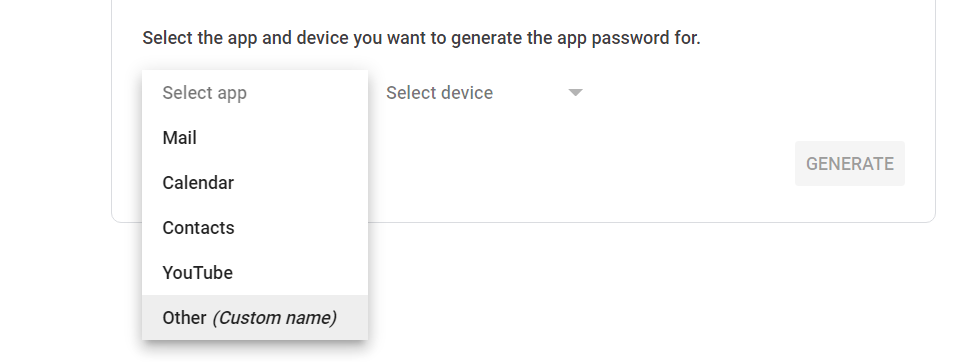
Go to https://myaccount.google.com/ and sign into your Gmail account.
Select Security.
Under "Signing in to Google," select App Passwords.
Generate app password by selecting custom option as follows and note down the password.

Postfix Configuration
Here Postfix will be configured to send email to your Gmail account. First make sure that you are using root account.
vim /etc/postfix/main.cf
Go through file carefully and add / update the necessary lines as below. Don't fully remove any default line. Some default lines are also depicted in the below configuration to aid positioning lines in the correct place.
smtpd_tls_cert_file=/etc/ssl/certs/ssl-cert-snakeoil.pem
smtpd_tls_key_file=/etc/ssl/private/ssl-cert-snakeoil.key
smtpd_tls_security_level=may

smtp_tls_CApath=/etc/ssl/certs
smtp_tls_security_level=may
smtp_tls_session_cache_database = btree:${data_directory}/smtp_scache
smtp_tls_CAfile = /etc/ssl/certs/ca-certificates.crt

smtpd_relay_restrictions = permit_mynetworks permit_sasl_authenticated defer_unauth_destination
myhostname = oxidized
alias_maps = hash:/etc/aliases
alias_database = hash:/etc/aliases
myorigin = /etc/mailname
mydestination = $myhostname, oxidized.learn.com, oxidized, localhost.localdomain, localhost
relayhost = [smtp.gmail.com]:587
mynetworks = 127.0.0.0/8 [::ffff:127.0.0.0]/104 [::1]/128
mailbox_size_limit = 0
recipient_delimiter = +
inet_interfaces = all
inet_protocols = all
smtp_sasl_auth_enable = yes
smtp_sasl_password_maps = hash:/etc/postfix/sasl_passwd
smtp_sasl_security_options = noanonymous
vim /etc/postfix/sasl_passwd
Add the following content to /etc/postfix/sasl_passwd while changing oxidizedfor and gecqeehdvtrrsed5 (app password).
[smtp.gmail.com]:587 oxidizedfor@gmail.com:gecqeehdvtrrsed5
Close the above file and continue.
chown root:root /etc/postfix/sasl_passwd
chmod 600 /etc/postfix/sasl_passwd
postmap /etc/postfix/sasl_passwd
systemctl restart postfix
apt install mailutils
Check email sending. Replace oxidizedfor accordingly. Check the gmail inbox (also the spam folder). You may have to refresh your Gmail inbox several times.
echo "Test Postfix Gmail SMTP Relay" | mail -s "Postfix Gmail SMTP Relay" oxidizedfor@gmail.com
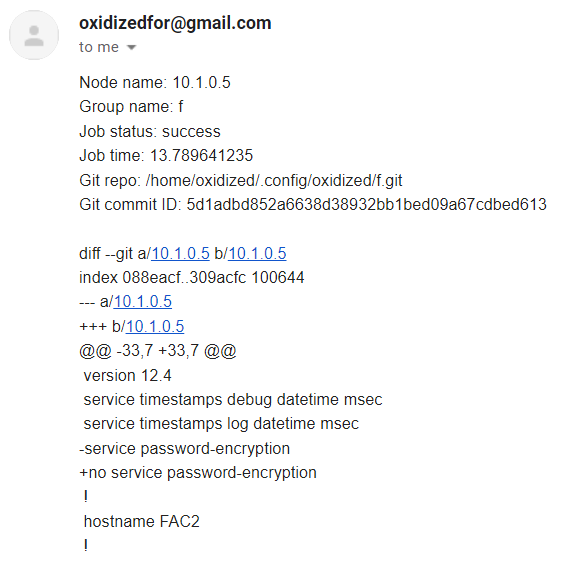
An email will be sent to the Gmail account after a saved configuration change, when Oxidized get refreshed.
Such email content will be in a similar format as follows. There the minus (-) mark in front of the command says that particular command is reverted. And plus (+) mark in front of the command says the reverted command is replaced by it.

After completing the lab, you should email two screenshots as one from a device configuration /config page of Oxidized in LibreNMS and, the other from configuration change notification email, to deepthi@learn.ac.lk. Please mention your 'workshop registration details' in the email.
Attachments (11)
- librenms api settings.png (53.7 KB ) - added by 4 years ago.
- librenms create token.png (6.0 KB ) - added by 4 years ago.
- select app.png (25.8 KB ) - added by 4 years ago.
- oxidised librenms.png (81.7 KB ) - added by 4 years ago.
- librenms oxidized.png (15.4 KB ) - added by 4 years ago.
- history.png (27.3 KB ) - added by 4 years ago.
- notification.png (34.9 KB ) - added by 4 years ago.
- mail name.png (11.8 KB ) - added by 4 years ago.
- internet site.png (35.0 KB ) - added by 4 years ago.
- device config.png (23.6 KB ) - added by 4 years ago.
- diff.png (20.1 KB ) - added by 4 years ago.
Download all attachments as: .zip