| Version 19 (modified by , 3 years ago) ( diff ) |
|---|
Ansible Lab
In this lab, you will install and use Ansible to install MySQL/MariaDB and create database remotely.
Requirements:
Participants are requested to have a computer with Windows 8/10/11 (8GB RAM, 25GB free disk space) with Virtualbox (version 6 or higher) hypervisor and PuTTY installed.
In Virtualbox, 'Extension pack' should be installed.
A wired internet connection is preferred.
Virtual Machine (VM) Setup
Download VM from the following Link.
https://docs.learn.ac.lk/index.php/s/YcojJ2544b40Zw4
Import the VM to Virtualbox.
Username and Password: docker
May have to create Virtualbox Host-Only Network Adapter
File > Host Network Manager > Create
Test internet connectivity.
This setup needs 3 VMs (one as control node and the others will be managed nodes). Import the same VM image and setup 3 VMs accordingly.
Login and check IP addresses of all VMs.
ip add
If they are same, then change them accordingly. You may disable dhcp and assign static IP addresses according to your setups.
vi /etc/netplan/00-installer-config.yaml
 enp0s8:
      addresses : [192.168.56.105/24]
:wq
netplan apply
Login using PuTTY.
Setup Network
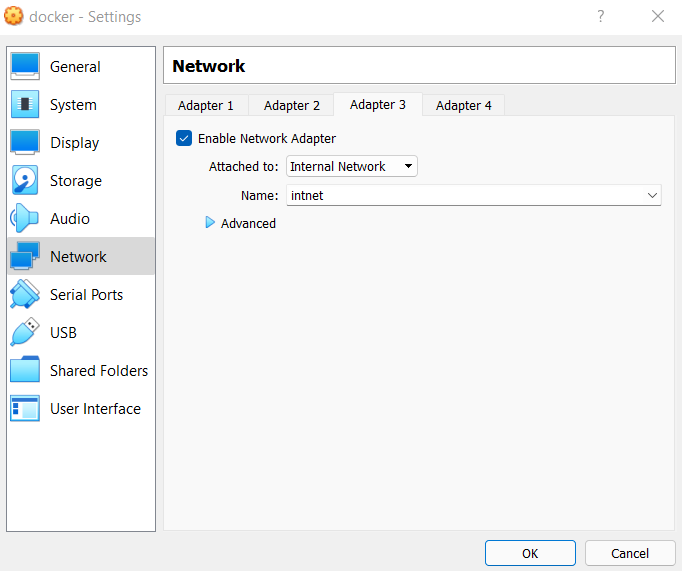
Connect all VMs to 'Internal Network'.
Settings > Network > Adpater 3
Find the 'Internal Network' network interface.
ip add
Edit network configurations of VMs according to your setups.
vi /etc/netplan/00-installer-config.yaml
 enp0s9:
      addresses : [10.1.1.1/24]
:wq
netplan apply
Repeat the above steps in each machine accordingly and test the network connectivity.
Setup Nodes
In control node
Login as root to the node.
Change the hostname.
hostnamectl set-hostname controlnode
nano /etc/hosts
127.0.0.1 localhost
127.0.1.1 controlnode
reboot
Install Ansible
apt install ansible
In each managed node
Login as root to the node and change hostname. Each should have a unique hostname.
hostnamectl set-hostname m1
nano /etc/hosts
127.0.0.1 localhost
127.0.1.1 m1
reboot
Setup Passwordless SSH
Login to control node as normal user.
ssh-keygen -t rsa
Continue by entering the prompts.
cat /home/docker/.ssh/id_rsa.pub
Copy the ssh keys (the output of the above command) generated on the control node, paste and save it in the authorized_keys file on both managed nodes.
nano /home/docker/.ssh/authorized_keys
Verify passwordless ssh from control node to other nodes.
ssh docker@<managed node internal network IP address>
Add the managed nodes to control node Ansible hosts file
Login to the control node.
nano inventory
Insert the managed nodes' internal network IP addresses to the file according to your setting. And save it.
10.1.1.2
10.1.1.3
Verify connectivity
ansible all -i inventory -m ping
Output should be similar to the following.
10.1.1.2 | SUCCESS => {
    "ansible_facts": {
        "discovered_interpreter_python": "/usr/bin/python3"
    },
    "changed": false,
    "ping": "pong"
}
10.1.1.3 | SUCCESS => {
    "ansible_facts": {
        "discovered_interpreter_python": "/usr/bin/python3"
    },
    "changed": false,
    "ping": "pong"
}
Create the Playbook - In control node - As root
nano <playbook name>.yml
- name: setup mysql
  hosts: all
  become: yes
  gather_facts: false
  vars:
    root_password: Redact#12
    db_name: new
    user_name: newuser
    user_password: Redact#13
  tasks:
    - name: Update
      shell:  apt update

    - name: install python, pip etc
      shell: apt-get -y install "{{ item }}"
      with_items:
        - pip
        - python3-dev
        - default-libmysqlclient-dev
        - build-essential

    - name: Install MySQL server
      shell: apt-get -y install mysql-server

    - name: Install MySQL client
      shell: apt-get -y install mysql-client

    - name: pip install mysqlclient
      shell: pip install mysqlclient

    - name: Start the MySQL service
      action: service name=mysql state=started

    - name: copy .my.cnf file with root password credentials
      template: src=/home/docker/my.cnf.j2 dest=/root/.my.cnf owner=root mode=0600

    - name: update mysql root password for all root accounts
      mysql_user:
        name: root
        host: localhost
        password: "{{ root_password }}"

    - name: Create database
      shell: mysql -u root -p{{ root_password }} -e 'CREATE DATABASE IF NOT EXISTS {{ db_name }};'

    - name: Create user
      shell: mysql -u root -p{{ root_password }} -e "CREATE USER '{{ user_name }}'@'%' IDENTIFIED BY '{{ user_password }}';"

    - name: Grant permissions
      shell: mysql -u root -p{{ root_password }} -e "GRANT SELECT,INSERT,UPDATE,DELETE,CREATE,CREATE TEMPORARY TABLES,DROP,INDEX,ALTER ON {{ db_name }}.* TO '{{ user_name }}'@'%';"

    - name: Reload privileges
      shell: mysql -u root -p{{ root_password }} -e "FLUSH PRIVILEGES;"
Create template
nano my.cnf.j2.yml
[client]
user=root
password={{ root_password }}
Run the Playbook - In control node - As root
ansible-playbook --ask-become-pass -i inventory <playbook name>.yml
Give the managed VM password (only one password as the VMs have the same password) when prompted.
You will get a similar output as following upon successful completion of the plays. Troubleshoot if there are errors.
PLAY [setup mysql] ************************************************************************************************************************************************************************************************

TASK [Update] *****************************************************************************************************************************************************************************************************
changed: [10.1.1.3]
changed: [10.1.1.2]

TASK [install python, pip etc] ************************************************************************************************************************************************************************************
changed: [10.1.1.2] => (item=pip)
changed: [10.1.1.2] => (item=python3-dev)
changed: [10.1.1.2] => (item=default-libmysqlclient-dev)
changed: [10.1.1.2] => (item=build-essential)
[WARNING]: Consider using the apt module rather than running 'apt-get'.  If you need to use command because apt is insufficient you can add 'warn: false' to this command task or set 'command_warnings=False' in
ansible.cfg to get rid of this message.
changed: [10.1.1.3] => (item=pip)
changed: [10.1.1.3] => (item=python3-dev)
changed: [10.1.1.3] => (item=default-libmysqlclient-dev)
changed: [10.1.1.3] => (item=build-essential)

TASK [Install MySQL server] ***************************************************************************************************************************************************************************************
changed: [10.1.1.2]
changed: [10.1.1.3]

TASK [Install MySQL client] ***************************************************************************************************************************************************************************************
changed: [10.1.1.3]
changed: [10.1.1.2]

TASK [pip install mysqlclient] ************************************************************************************************************************************************************************************
changed: [10.1.1.2]
changed: [10.1.1.3]

TASK [Start the MySQL service] ************************************************************************************************************************************************************************************
ok: [10.1.1.3]
ok: [10.1.1.2]

TASK [copy .my.cnf file with root password credentials] ***********************************************************************************************************************************************************
changed: [10.1.1.3]
changed: [10.1.1.2]

TASK [update mysql root password for all root accounts] ***********************************************************************************************************************************************************
changed: [10.1.1.3]
changed: [10.1.1.2]

TASK [Create database] ********************************************************************************************************************************************************************************************
changed: [10.1.1.3]
changed: [10.1.1.2]

TASK [Create user] ************************************************************************************************************************************************************************************************
changed: [10.1.1.3]
changed: [10.1.1.2]

TASK [Grant permissions] ******************************************************************************************************************************************************************************************
changed: [10.1.1.2]
changed: [10.1.1.3]

TASK [Reload privileges] ******************************************************************************************************************************************************************************************
changed: [10.1.1.2]
changed: [10.1.1.3]

PLAY RECAP ********************************************************************************************************************************************************************************************************
10.1.1.2                   : ok=12   changed=11   unreachable=0    failed=0    skipped=0    rescued=0    ignored=0
10.1.1.3                   : ok=12   changed=11   unreachable=0    failed=0    skipped=0    rescued=0    ignored=0
Verify results - In managed nodes
mysql -u newuser -pRedact#13
show databases;
Attachments (1)
- internal net.png (31.0 KB ) - added by 3 years ago.
Download all attachments as: .zip

